Working with Lists in the XOM / BOM
The XOM (Execution Object Model) and BOM (Business Object Model) are key artifacts of our Rule project. The execution object model (XOM) is the model against which you run rules, it references the application objects and data, and is the base implementation of the business object model (BOM). For more information about XOM/BOM visit the IBM Knowledge Center here.
We can generate our BOM entries from a XOM (Java or XSD) and get the objects we will verbalize for our rules. A very common requirement in a project is to work with Lists and return a populated List with values from a Rule Action or Decision Table. You will notice that after you create your BOM entry from an XOM with Lists (maxOccurs=”unbounded”) you will get an object of type java.util.Vector but with no direct relationship between the elements. Please review the following problem example and a workaround on how to fix it and implement Lists correctly.
Problem:
Let’s say you have an XSD with an element like this:
<complexType name=”RecruitsList”>
<sequence>
<element name=”recruits” type=”tns:Recruit” maxOccurs=”unbounded” minOccurs=”0″></element>
</sequence>
</complexType>
After you create the BOM entry, you will get an object like this:
With no proper verbalization and without a way to use it in a Rule Action, Decision Table or Decision Tree correctly. In this example we want to add objects of type Recruit to our RecruitsList and display this list in the output of our Decision Service. Follow the steps below to implement a workaround and accomplish our goal.
Steps:
- Creating a new Method member
- Let’s remove this verbalization and navigate to the Class tab.
- We are going to create a new method to add our Objects. Click “New…” in the Members section.
- Select “Method”, give a proper Name and “void” for Type.
- Now add Arguments according to the Object you are going to add to your list, in our example the Recruit’s attributes. At the end you should have something like this:
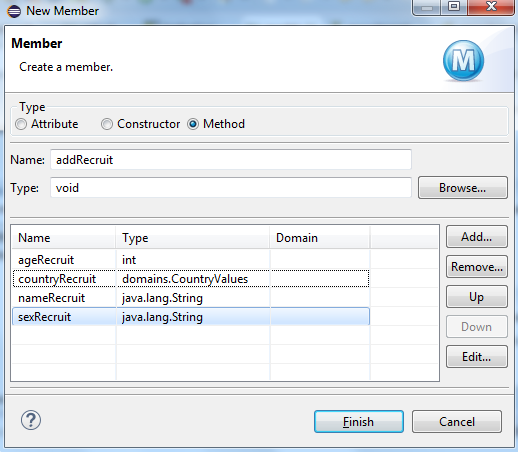
- Tip: Remember that the types have to match, if you are using a virtual value assign the corresponding type like the example. For more information about dynamic domains and virtual values read my previous post here.
- Now we need to create a proper verbalization for our new method and implement the BOM to XOM Mapping logic.
- Navigate to the Member Verbalization section and click “Create”. Modify the Action phrase according to your Object. In this sample:

- The last and most important step is to define our BOM to XOM Mapping logic. We need to map our method arguments with the attributes of our Object, in this sample with the Recruit’s age, country, name and sex:
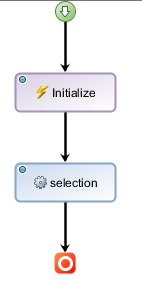
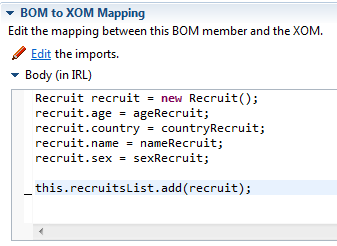 Tip: Don’t forget to initialize the response list variable in your ruleflow or variableSet.
Results:
Now we are ready to use our method in any Rule and return a list structure schema in our Decision Service response!
Decision Table demonstration sample:
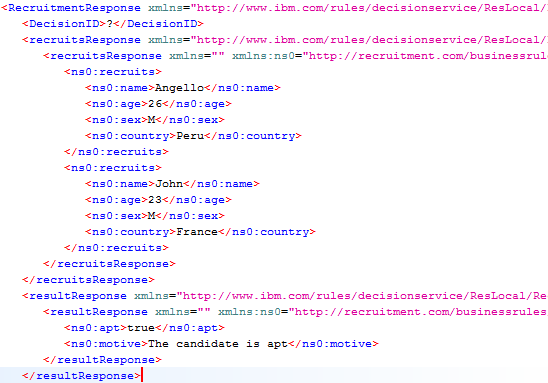
After we test our rules we will see this list structure in the response (Testing with SoapUI):
Please feel free to comment or contact me with any doubts or feedback. Thank you!
- Published in Java, Rule Authoring, Rule Designer, Rule Execution Server (RES)
Debugging a simple Ruleflow in Rule Designer
There are many ways to test our rules, we can use Excel DVS testsuites, decision operations, web services applications like SoapUI and more, but sometimes we need to debug our ruleflow to find a particular bug that is preventing us to continue. When developing a new rule project in Rule Designer we often need to see the output of our rules without having to deploy our solution and see the behavior of the ruleflow to compare the variables values.
In this article I am going to show how to debug a simple ruleflow using a decision operation to test your Rules.
Steps:
Let’s assume we already have the ruleflow, variables and rules.
- Creating the Decision Operation
- Right click the “deployment” folder in your Rule Project and select New -> Decision Operation.
- Give a proper name, select the Rule Project and select the Ruleflow inside your Rule Project.
- Now open your Decision Operation and you should have one like this:

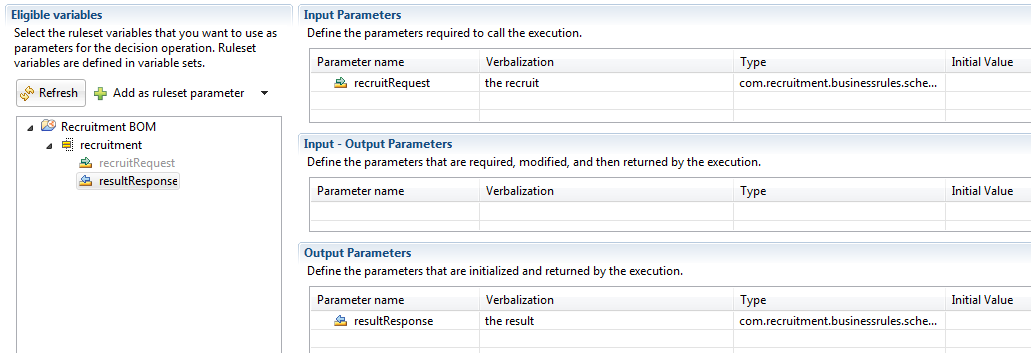
- Click “Define” or to the “Signature” tab.
- Expand your varible set and drag and drop the corresponding variables to the Input and Output Parameters.
- Tip: Is a good practice to name your input variable with “Request” at the end and “Response” for your output.
- Setting the breakpoints
- There a many places where we can define our breakpoints, it depends on what you need to test and where do you want the flow to stop execution. I will show some examples of places where you can put your breakpoints next.
- Action Rule:
- Decision Table:
- BOM member
- Ruleflow artifacts
- Creating the Debug Configuration
- Navigate to Run -> Debug Configurations… in your Rule Designer top bar.
- Locate the Decision Operation artifact, right click and select New.
- Give a proper name and Browse for your Decision Operation.
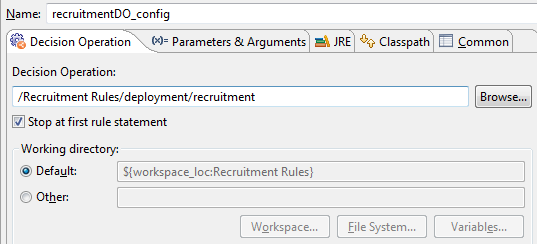
- Tip: The checkbox “Stop at first rule statement” guarantees you enter debug mode if you didn’t set any breakpoints.
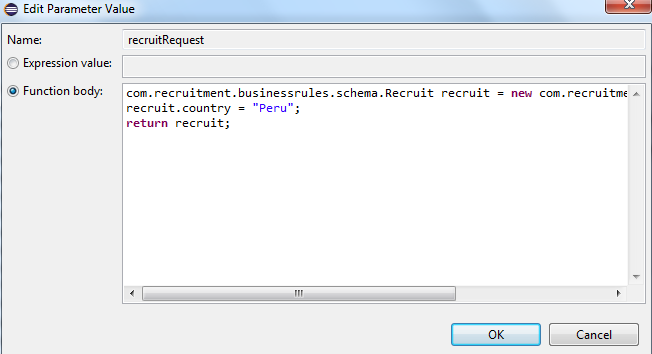
- Now the most important step is to define the “Parameters and Arguments” for this configuration, select the tab and click “Edit Value”.
- You have to create and return a new object of your Input Parameter class, you can also assign testing values. Click “Function body” and add the proper code. Take a look at my sample:
- Click Apply and Debug.
Results:
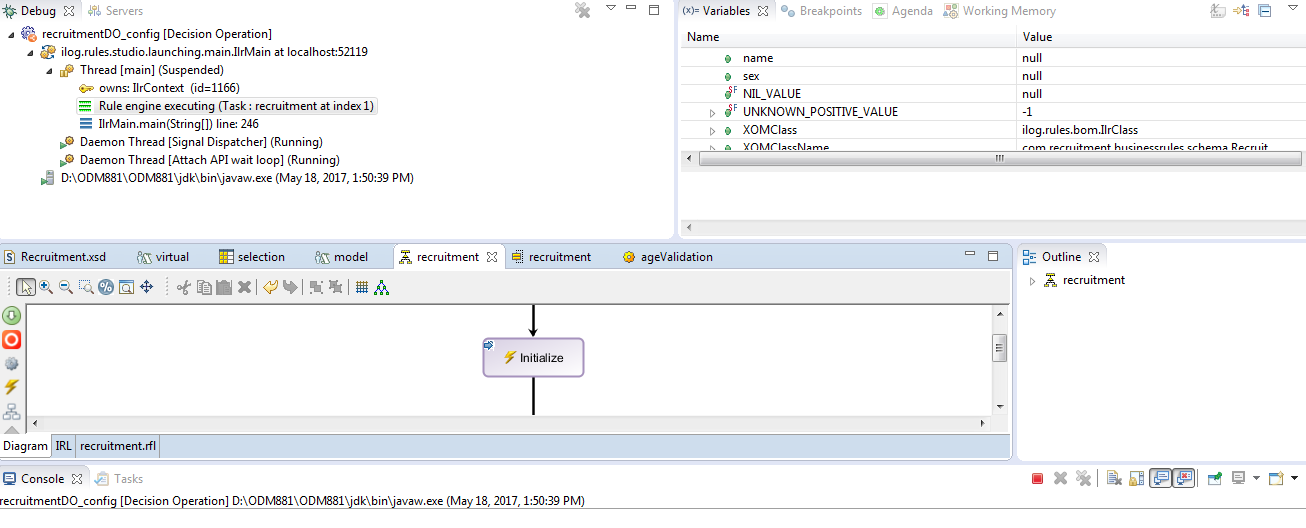
Now you are in Debug mode, watch your variables and step through your code and rules!
I hope you enjoy this article, as always please feel free to contact me about any question or feedback. Thank you!
- Published in Debug, Decision Operation, Java, Rule Authoring, Rule Designer, Ruleflow
Creating Dynamic Domains from an Excel file
A very common requirement in a Rule development project is to manage some data objects with dynamic domains. But wait, what are domains? A Domain places a restriction for your BOM members, this includes attributes, method arguments and classes. For more information about domains click here.
There are many ways to use Domains, the easiest way is to use Static References to define the possible values. But what if we want to have an external source to manage and update our values frecuently? Well, that’s when Dynamic Domains come in handy. In this tutorial we will focus on creating dynamic domains from an excel file.
The IBM knowledge center provides an article about this topic but without some key details that can make you spend more time than neccesary.
Steps:
-
- Creating the Domains Values Excel File
-
- The Excel file must have the structure defined by the Excel Domain Provider:
- Value column
- Label column
- BOM to XOM column
- Documentation and additonal labels/documentation for other locales (Optional)
- You can have multiple sheets, each one representing a Domain. Example: Countries, Cities, Streets, etc.
- Each row represents a value for that particular Domain, you cannot have merged cells.
- Here is an example of how your excel file should look like:
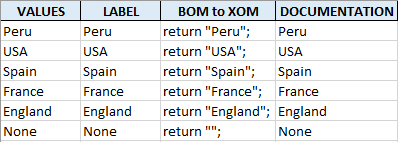
- Tip: If you want to have the option to send a blank value use “None” or “NA” in the Values and Label columns and return “”; in the BOM to XOM column. Check the example above.
- Save the Excel file in the resources folder or your BOM rule project.
- The Excel file must have the structure defined by the Excel Domain Provider:
-
- Creating the Dynamic Domains from the Domains Excel File
-
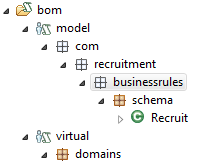
- It is recommended to have the Domain values in a separate BOM model, or at least in a separate package from your original objects. Here is a simple example:
- Create a class in your new BOM model for each Domain you have. In this example “CountryValues”.
- Open the new class and expand the BOM to XOM Mapping section. In the Execution name field you need to specify the type for your Domain values, for example java.lang.String:

- Now you are ready to create your dynamic domains, locate the Domain section and click Create.
- Select the Excel option under Dynamic Domains, click Next and then select your excel file.
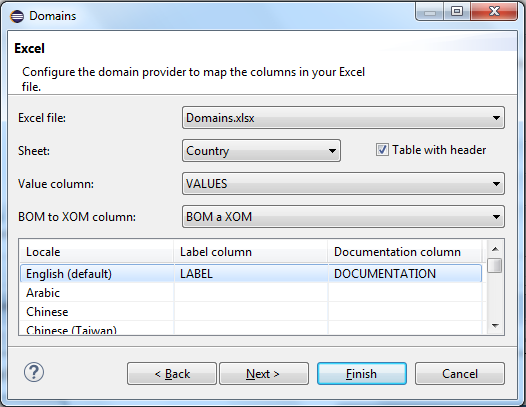
- Select the correct sheet for the Domain you are working on and check the “Table with Header” option to see the column header values. Now map the columns to the appropiate field, here is how your final mapping should look like:
- The values should appear in the Domain section:
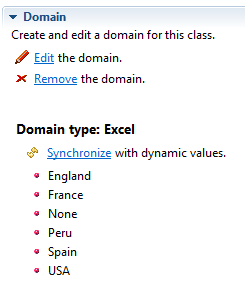
- You can update the values by modifying the Excel file and clicking “Synchronize” or at the BOM Entry level, clicking “Update”:
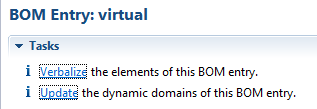
- It is recommended to have the Domain values in a separate BOM model, or at least in a separate package from your original objects. Here is a simple example:
-
- Creating the virtual attribute
-
- Our first intention would be to change the type our attribute to our new virtual class but this would create a duplicate of the original member and a BOM to XOM conflict error. That is why we need to create a virtual member for each attribute that is going to use Domains.
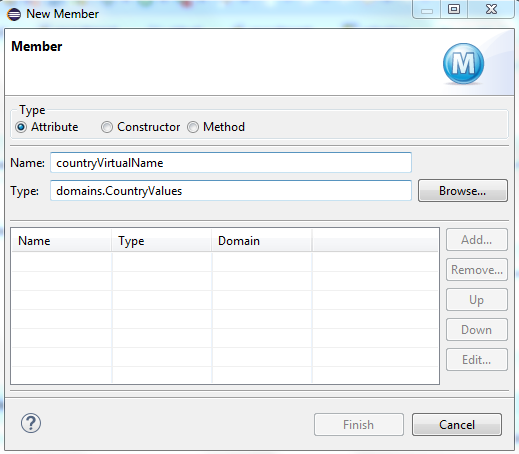
- Create a new member in your Class editor and in the type field select the virtual class with the Domains. In this example we are going to create “countryVirtualName”:
- Verbalize the member accordingly. You will need to change Edit the subject to elaborate correct sentences for Action and Navigation fields. Remember to delete the original member verbalization.
- Check the “Ignore for DVS” option to avoid having the virtual value being added when testing with DVS Excel testsuites.
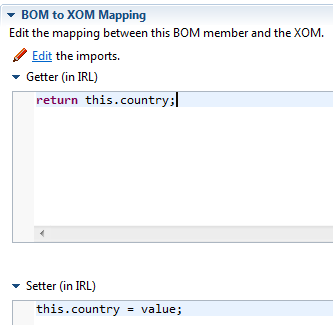
- And the last but most important step is to finish the BOM to XOM mapping. In Getter return the original member and in Setter assign the value to the original member. Example:
-
- Creating the Domains Values Excel File
Results:
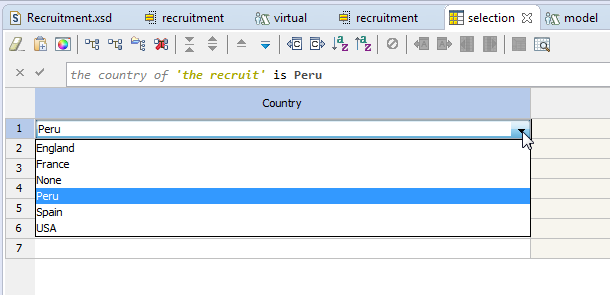
Now you are ready to use Dinamyc Domains for your BOM members like in the Decision Table sample below:
Please feel free to contact me with any queries or feedback about this article. Thank you!
- Published in Domains, Rule Authoring, Rule Designer


