Rule Designer – Eclipse ODM component
ODM on Docker!
If you are a DevOps enthusiast like me you probably love Docker and have been using it for a while. If you are new to Docker, please check this link to learn more.
IBM released an IBM ODM Docker image designed for developers and free to use, in this tutorial we are going to set it up step by step and gain full functionality of this amazing feature. My setup for running this tutorial is:
- Host machine: Windows 10 Pro
- Elementary OS (Ubuntu Dist.) Virtual Box Machine with Docker (I tried using my Alpine-Docker image but I encountered some extra configurations needed for the ODM JVM, contact me for more information about this subject)
- Eclipse Luna with Rule Designer for developers plugin
Steps:
- Install IBM ODM Docker image
- Open a new terminal window and run the following command: docker pull ibmcom/odm

- This will download all the ODM files and create the IBM ODM image. Depending on your internet conection this process could take a few minutes.
- Now run the following command to start the docker IBM ODM container instance:
docker run -e LICENSE=accept -p 9060:9060 -p 9443:9443 ibmcom/odm
- Note that we are passing an environment value to accept the license and mapping the ports 9060 and 9443. If you run with JVM memory problems use -m 1g or the amount of java heap size memory you can use for this container to run smoothly and faster.
- If everything went well you should see the beautiful IBM ODM logo printed in the terminal

- Now you are ready to use:
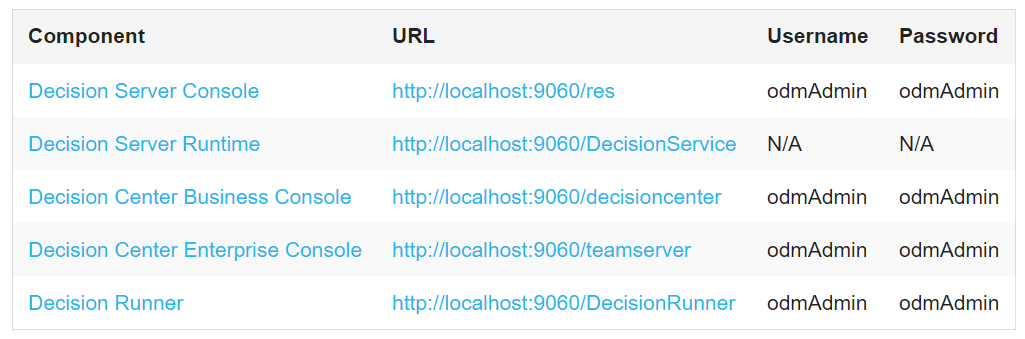
- Note that if you are using a Virtual Box VM like me you need to configure your networks and ip addresses to use the web applications in your host. In my case I use the 192.168.56.101 ip. See Host-Only adapter configurations and verify your networks by pinging the VM ip.
- Open a new terminal window and run the following command: docker pull ibmcom/odm
- Verify Installation
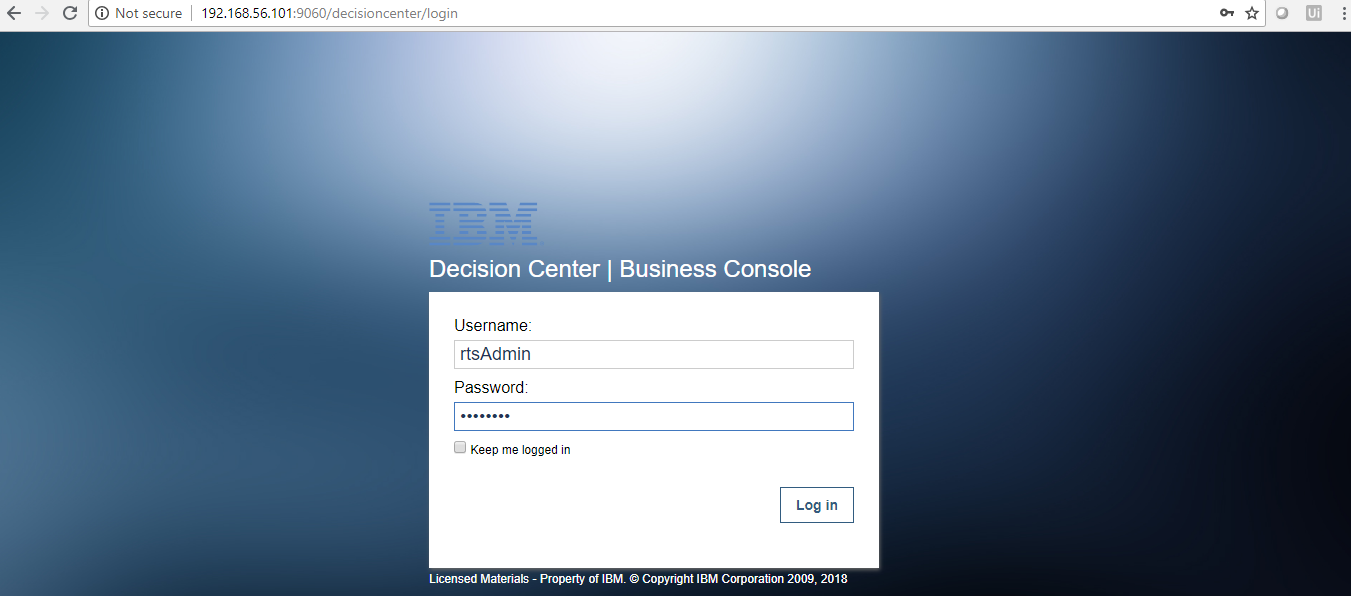
- Open the Decision Center, you should be able to log in odmAdmin or rtsAdmin:
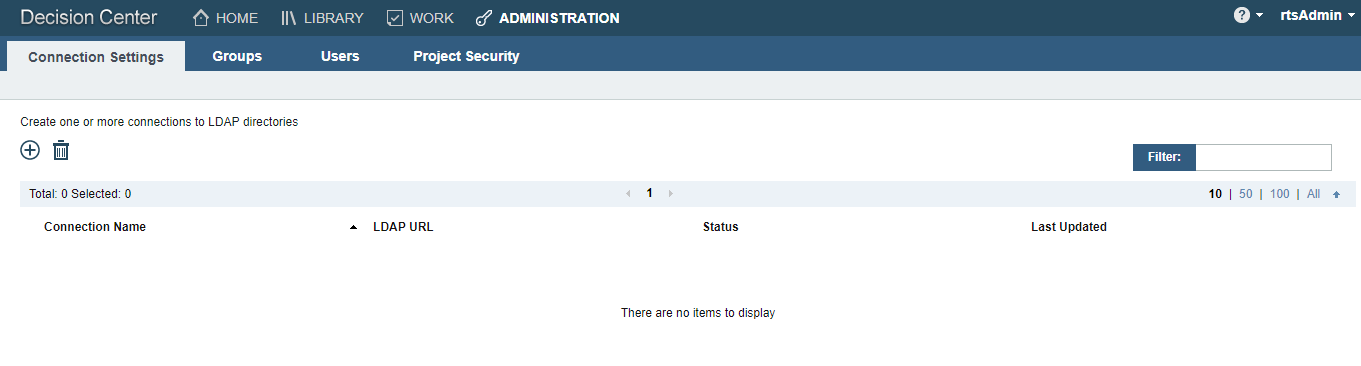
- And have a clean installation:
- Open the Decision Center, you should be able to log in odmAdmin or rtsAdmin:
-
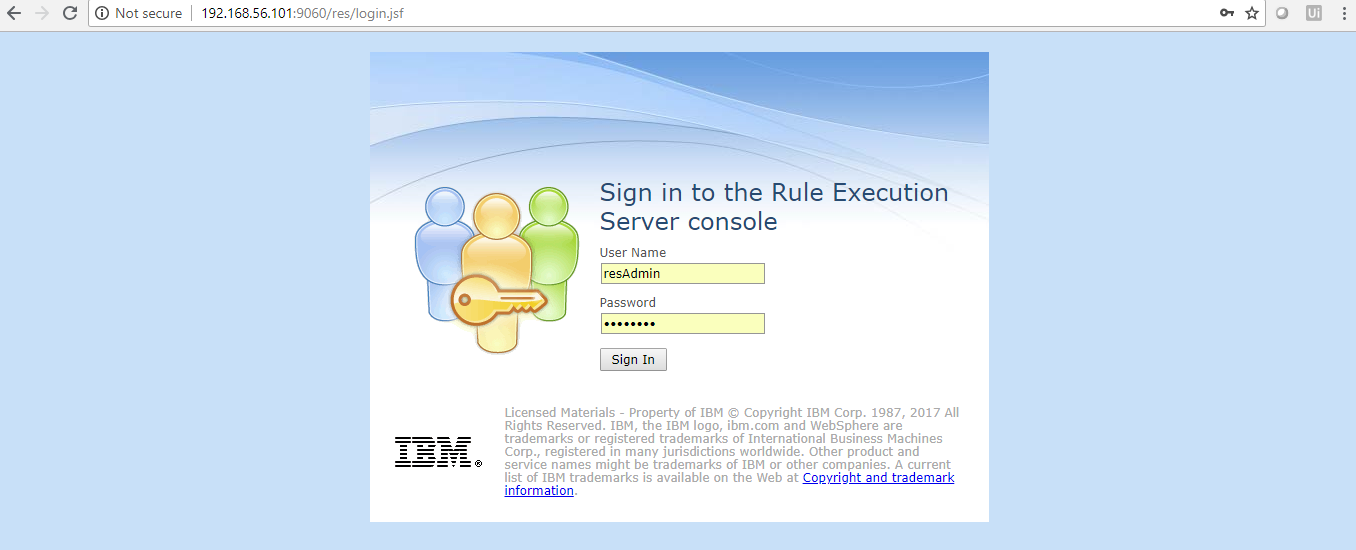
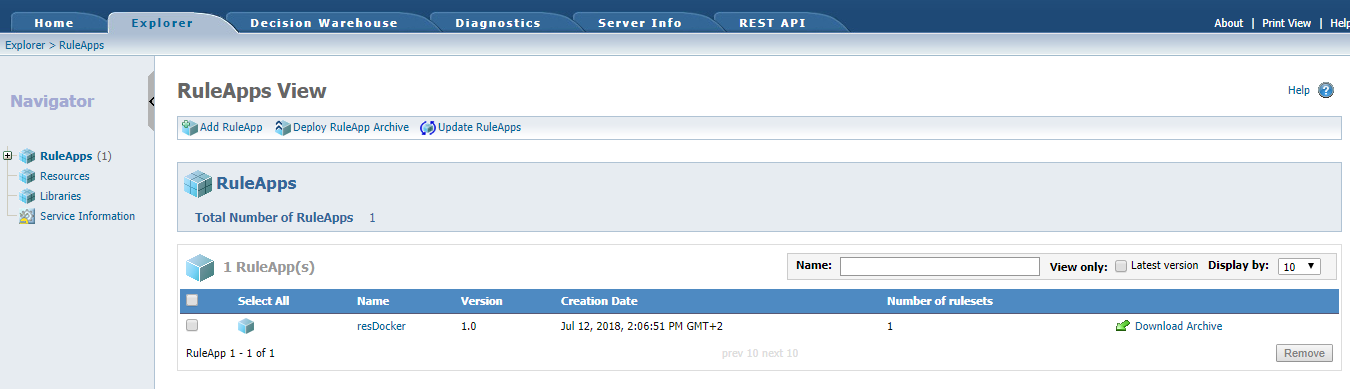
- Open the RES console, now use resAdmin:
- And also see no RuleApps deployed:
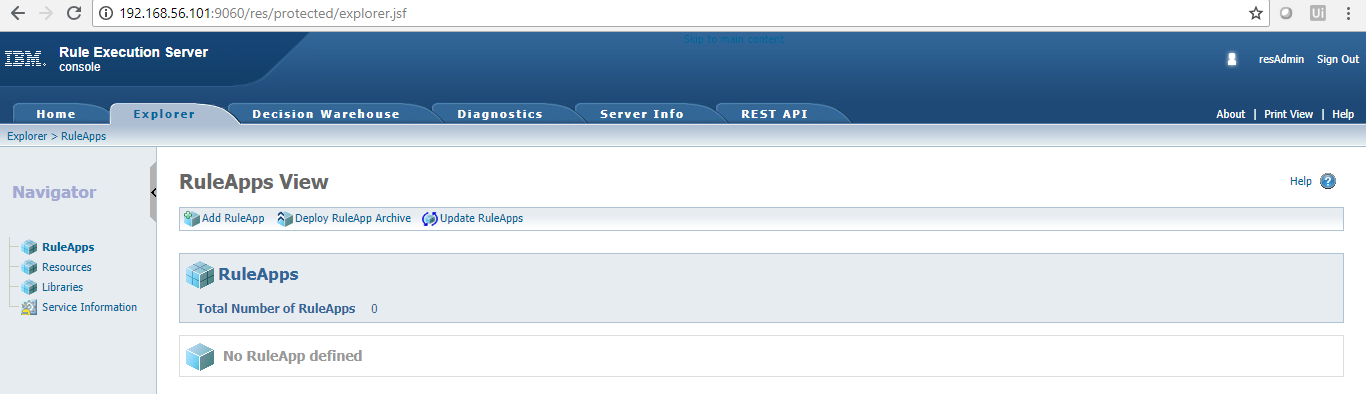
- Open the RES console, now use resAdmin:
- Install Eclipse with IBM ODM plugin
- Download and install Eclipse.
- Navigate to https://marketplace.eclipse.org/content/ibm-operational-decision-manager-developers-rule-designer and drag and drop the install

- Follow the instructions and reboot Eclipse, you should now see the Rule Designer perspective:

- Test IBM ODM on Docker
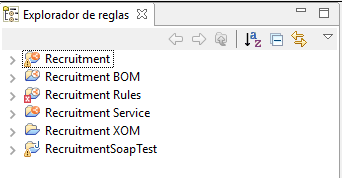
- Create a new project or import an existing project, I am going to use the Recruitment Service demo that I’ve using on previous posts:
- Connect the main project to the Decision Center

- Enter the proper URL and credentials and test the conection:

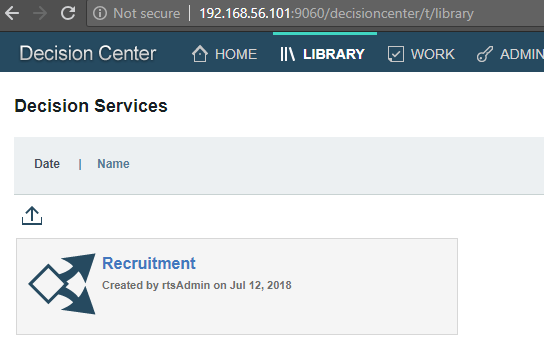
- Navigate to the Decision Center and verify the Decision Service is uploaded correctly:

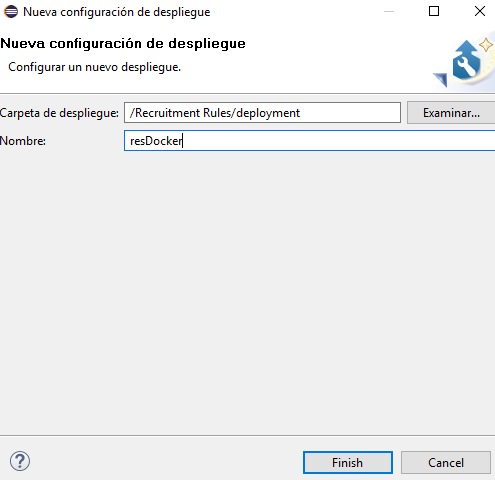
- Now we will test the deployment to the RES console, create a new Deployment Configuration
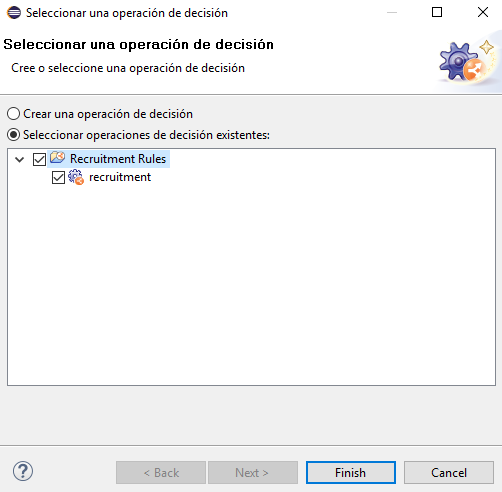
- Add a Decision Operation
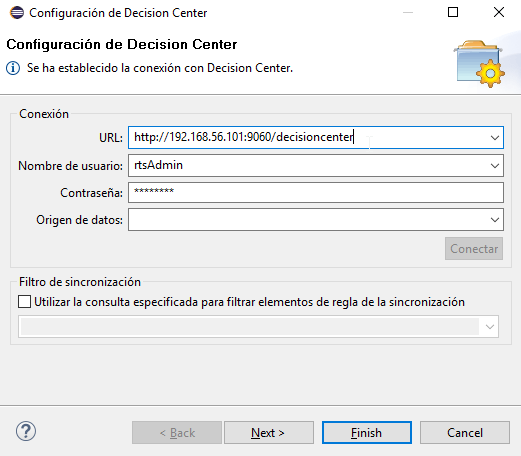
- Add the ODM docker RES service
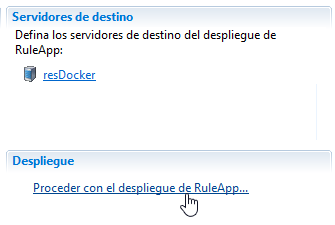
- Deploy the Ruleapp and select the recently added server

- Verify the ruleapp deployed correctly
- Create a new project or import an existing project, I am going to use the Recruitment Service demo that I’ve using on previous posts:
As you can see we setup an ODM distribution in minutes and got a project sync with Decision Center and deployed in the RES console. ODM on Docker is great, we can use all the Docker containers and images functionalities.
I hope you enjoy this tutorial and as always please feel free to contact me for any feedback or questions! Thank you!
- Published in Cloud, Decision Center, Docker, Rule Designer, Rule Execution Server (RES)
Populating Decision Tables with external data sources
One of the most used artifacts in IBM ODM is the decision table. In this post I will show how to populate your Decision Table in the Rule Designer with external data sources like a .txt file or an excel spreadsheet. Business users can have their logic in multiple sources (mostly in Excel files), that they need to dump in a decision table to create rules and business logic behavior in IBM ODM. We are going to achieve this by using a combination of Java, Ant builds and ilog rule designer-plug ins embedded in our suite. This is a very technical tutorial and it might be a little difficult to get it done quickly but feel free to contact me with any problems or if you get stuck at some point.
Steps:
- Setting up environment
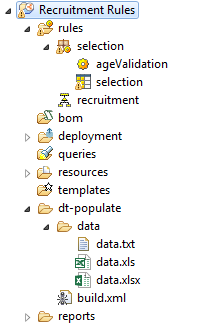
- Create a new folder (in my case “dt-populate”) in your Rule project with a “data” subfolder and with an Ant Build file.
- Tip: You can also create and manage the ant and data configuration in a new external Java project.
- Create an environment variable ECLIPSE_HOME with the location of your IBM ODM installation.
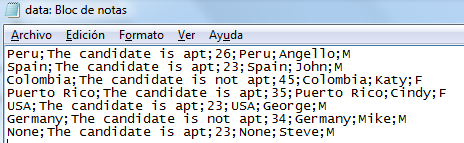
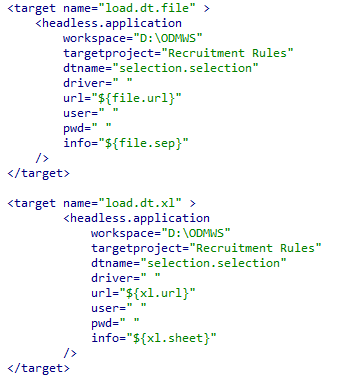
- Insert the txt or the excel file with the data you want to import in the data folder. In my example I am using both, please have this considerations:
- Txt:
- Separate each cell of the decision table by the semicolon “;”.
- Separate each row of the decision table with a space.
- Excel:
- Separate each cell of the decision table in each excel cell starting in A1.
- Separate each row of the decision table in each excel row.
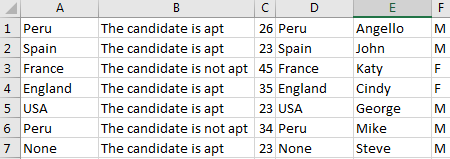
- Tip: Remember the version of Excel and the file extension because you will need it later on.
- Txt:
- Create a new folder (in my case “dt-populate”) in your Rule project with a “data” subfolder and with an Ant Build file.
- Creating the Ant Build file
- Add the project tag with a name, basedir and a default target attributes.

- Tip: For more about Ant Tasks review my previous post here.
- Inside the project tag we are going to add the properties, conditions, echo messages, definitions and our targets. For each of you will be different depending in your environment and ODM installation.

- Tip: Remember to change the values according to your workspace and installation folders.
- Now let’s add the definitions the includes the properties and connection parameters.
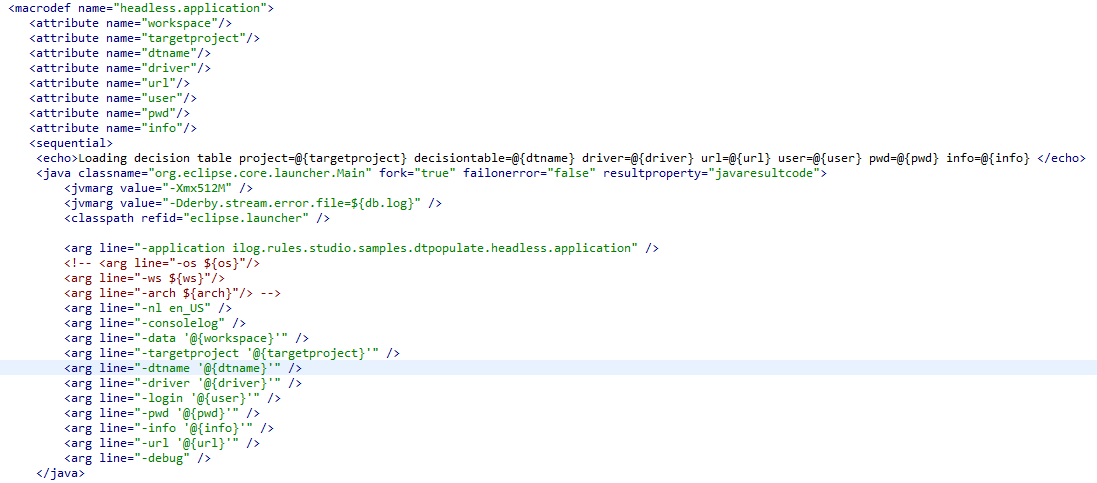

- Finally, we add the targets.
- Remember to change the values according to your environment and also review the excel file extension.
- Add the project tag with a name, basedir and a default target attributes.
- Running the Ant build file targets
- Right click the build.xml file and select Run As –> Ant build…
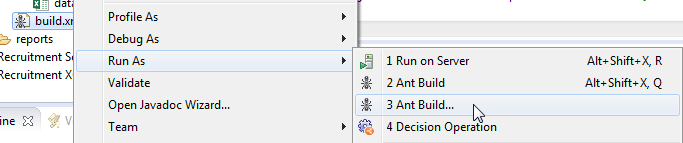
- Select the target you want, in this sample I will run the Excel file target, and click Run.
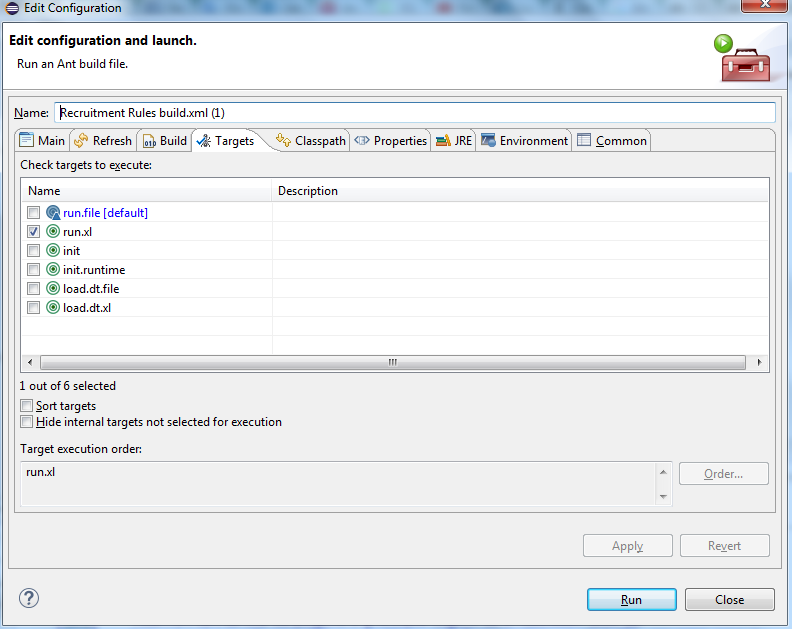
- You will see the console messages and at the end BUILD SUCCESSFUL.
- Right click the build.xml file and select Run As –> Ant build…
Results:
Now you can refresh and open your Decision Table and visualize all the values!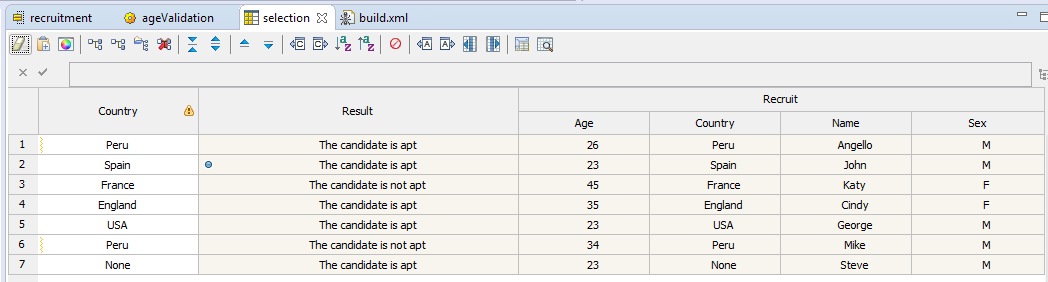
I hope you enjoy this tutorial, there are many more automation and integration to be done with Ant Tasks, please let me know what you wish to see next, and as always feel free to comment or contact me with any feedback or support! Thank you!
- Published in Ant Tasks, Decision Table, Java, Rule Authoring, Rule Designer
Decision Composer, integration with Rule Designer
In this post I will show a new way to start your Rule Projects, using a new IBM Bluemix Business Rules service feature called “Decision Composer”. This is currently in experimental mode but you can start to fully utilize its main features and see if it helps you in your organization. The decision composer is a new way to model your rules using the Decision Modeling Notation (learn more about DMN here), it is also very useful to business users with no ODM technical skills to define and model Rule Projects.
Steps:
- Creating a Decision Composer project
- First we need to access our IBM Bluemix account and select our Business Rules Service. If you don’t have an account or the Business Service installed please refer to my previous Bluemix post here.
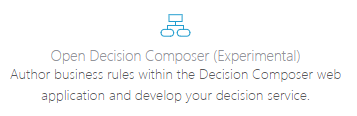
- Click on the “Open Decision Composer”
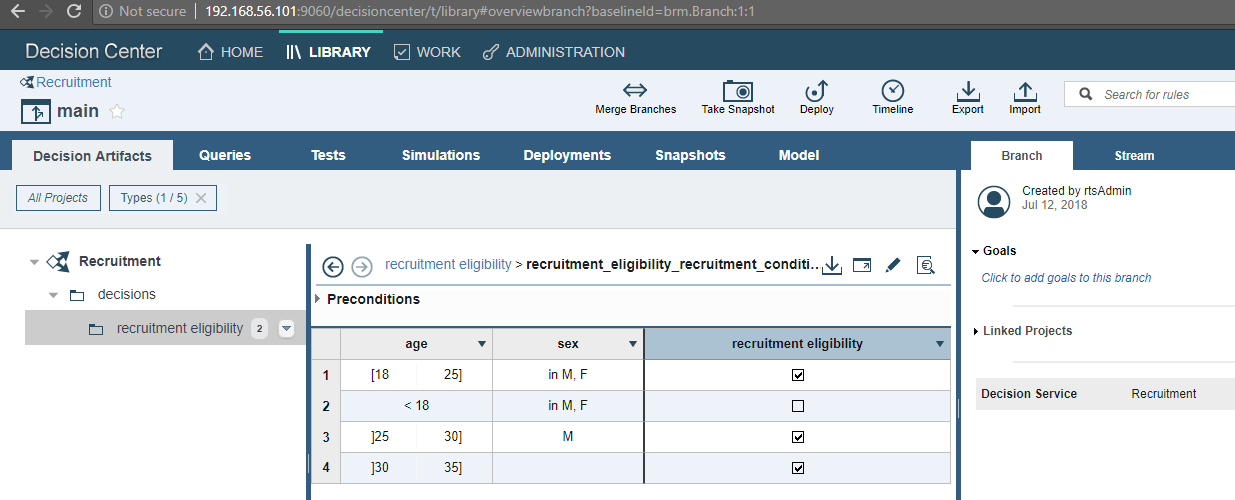
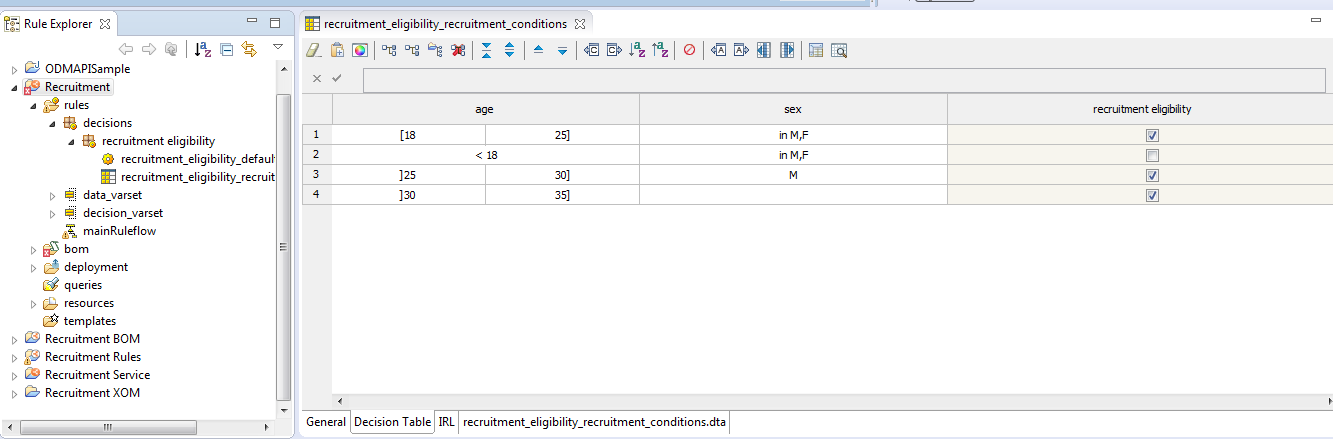
- Click “New Project”, give it a name and click “Create Project”. For this sample I will create a simple recruitment eligibility rule.
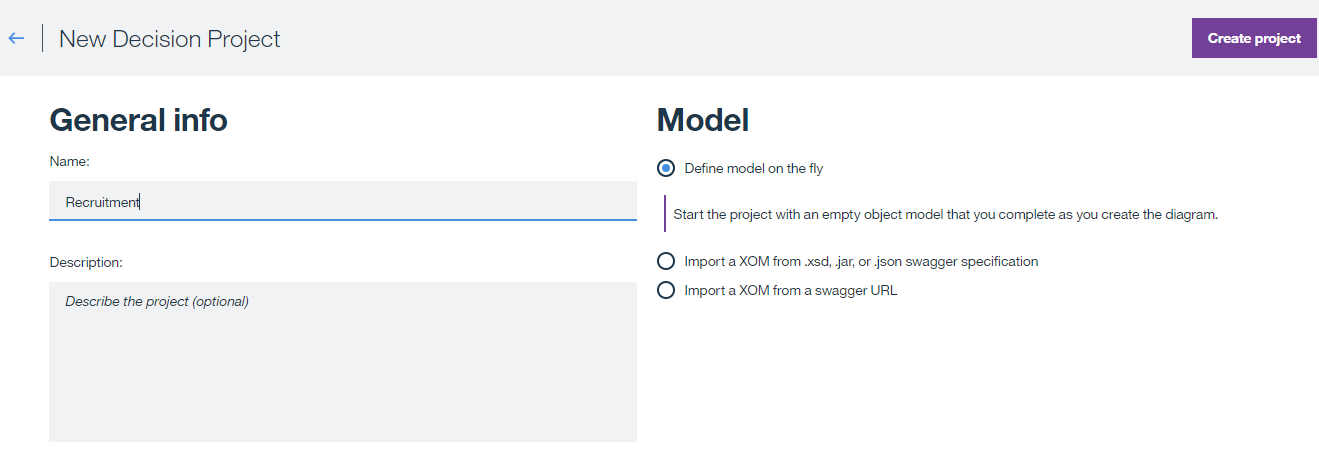
- Tip: You can import your XOM schema from a file or URL too
- Modeling rules in the Decision Composer
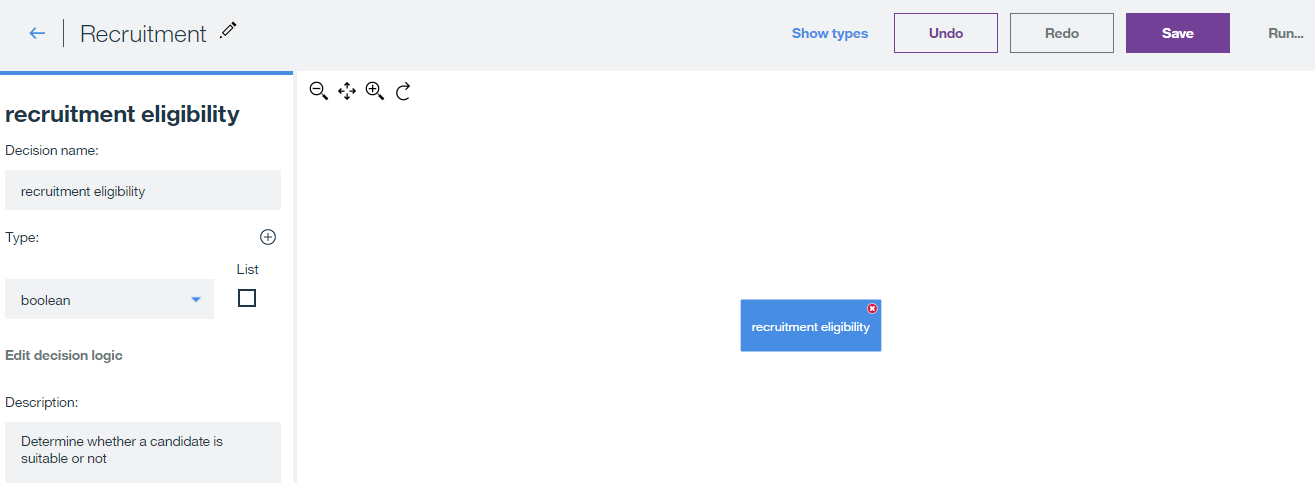
- By default we get a decision “Hello World” with a message, we can simply erase these 2 artifacts.
- Create a “data node”, it will create a square box representing a Decision Node. Click on it to modify it’s properties on the left panel. For my sample the output is a Boolean (true or false).
- Now that we have our Decision Node we need to add the Input data that will determine the rule outcome. Hover over decision node, click the + symbol and select “Input Data”.
- Do the same for each data field you need in your rule, in my sample I will need the age and sex of the candidate.
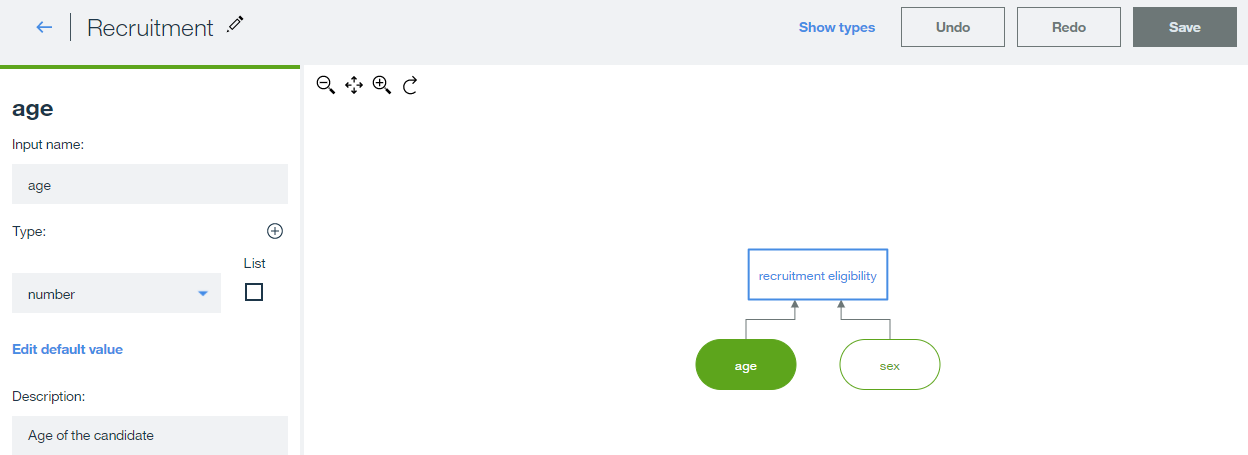
- Tip: Remember you can specify default values for each data
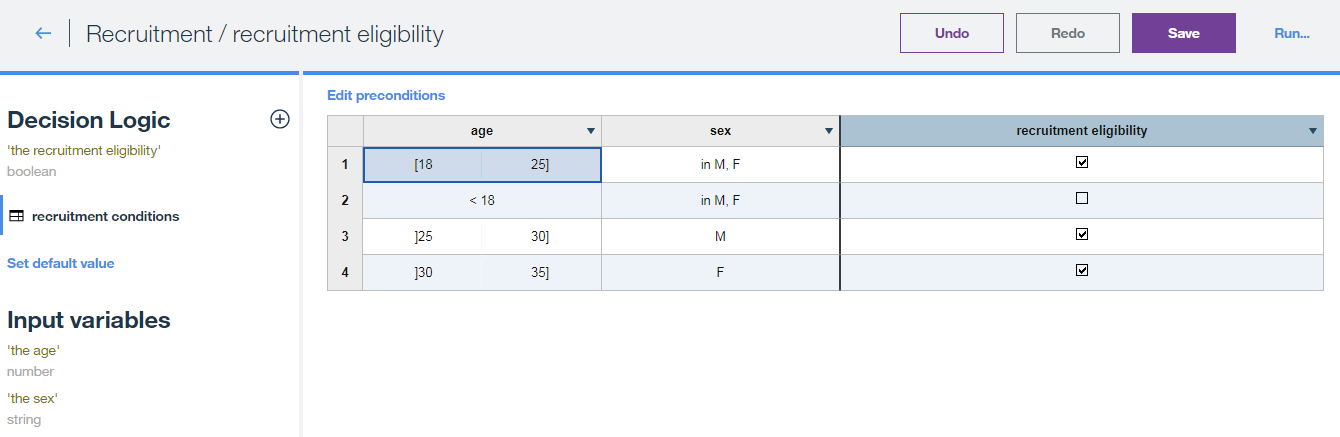
- Now we need to edit our business logic. Select the decision node and click “Edit decision logic” on the left panel. We can work with rule actions or decision tables. In this sample I will use a simple decision table to specify some rules:
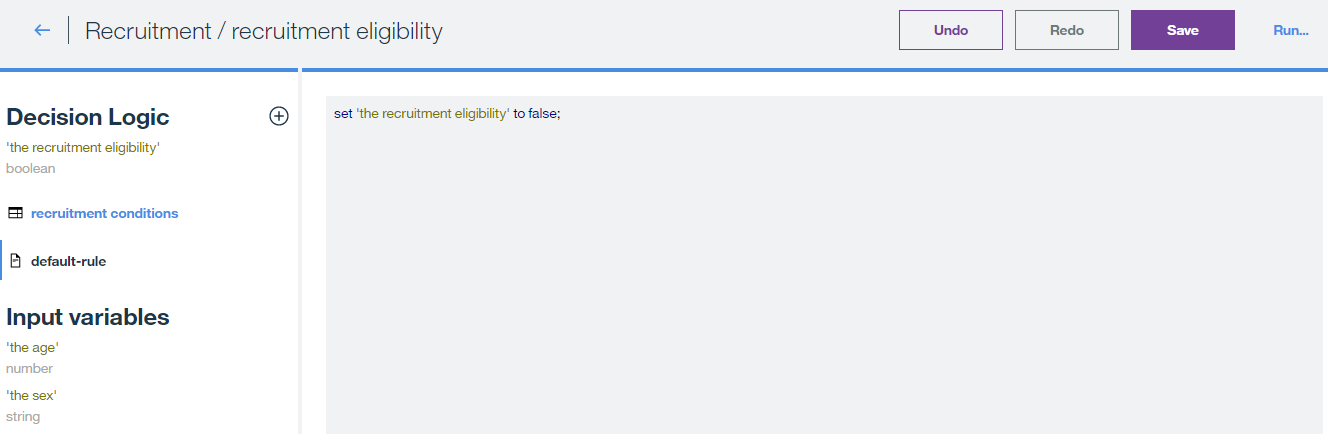
- Set a default value for the outcome variable:
- Save your changes.
- Testing and deploying our Decision project
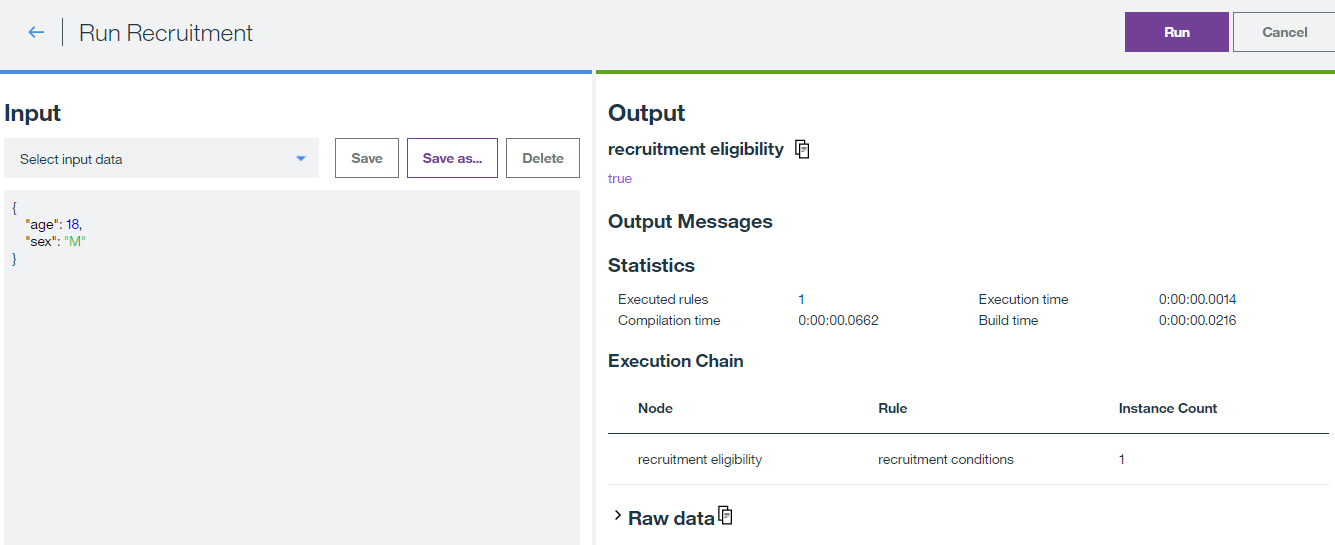
- Return to the main project screen, click “Run” and test the different scenarios of your rules:
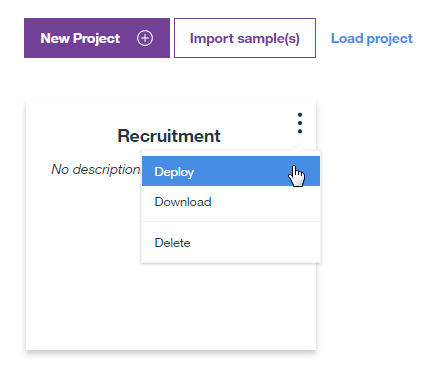
- Now you can deploy your project to your Bluemix Business Rules RES. Return to the project selection screen, hover over your decision project and click “Deploy”
- Input the Bluemix RES URL, username and password. Your rule is ready to use on the cloud.
- Return to the main project screen, click “Run” and test the different scenarios of your rules:
- Integrating the project with IBM ODM Rule Designer
- A great feature is that you can download this project and import it to your Rule Designer Eclipse workspace.
- In the same options list, click “Download”.
- In your Rule Designer workspace select File – Import – Existing projects into Workspace. Search for the files by viewing all file types and that’s it!
Let me know if you want to see more content like this and explore with the Decision Composer and DMN more. I hope you enjoy this tutorial and as always please feel free to contact me for any feedback or questions! Thank you!
- Published in Bluemix, Cloud, Rule Authoring, Rule Designer
Connecting to external Database with ODM API
The IBM ODM Decision Center and the Rule Execution Server values are stored, by default, in a Derby database that comes with the IBM ODM suite installation. During a rules development project we sometimes need to access these values and insert them on an external database or update this external database accordingly. In this post I will show you how to connect to an external Datase with the ODM API in java and execute a simple query after collecting Decision Center values. You can use this method in your project with any values you need from the Decision Center.
To understand the basics of the ODM API, please refer to my previous post about the IBM ODM API here.
- Preparing Decision Center Values
- In our Java project make sure you can connect successfully to the Decision Center.

- Personalize the values you need from the Decision Center. For example the Rule project name:

- In our Java project make sure you can connect successfully to the Decision Center.
- Connecting to an External DB
- Let’s create a new Java class with the Connection details.

- It is a good practice to have the value of the connection datasource in a properties file.

- Create a getConnection() method in the DBConnection class and add the following structure:
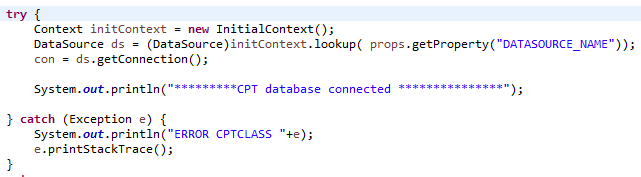
- Return the con variable and call this method from the main ODM API java class:

- Let’s create a new Java class with the Connection details.
Now you are ready to execute any statement in the external DB using the Decision Center variables. Query statement sample: ps = con.prepareStatement(“INSERT INTO db.dt VALUES (‘”+ruleProject.getName())
I hope you enjoy this tutorial and please feel free to contact me with any query or feedback, thank you!
- Published in Debug, Decision Center, Decision Table, Java, ODM API, Rule Designer
Custom log file with ODM API
Given the positive feedback from previous post we will continue to work further on with the ODM API and discover new possibilities and features to implement in our Rule projects. In this tutorial we will see how to create a custom log file, focusing on obtaining the values from Deployments of Decision Services within the Business Console.
To understand the basics of the IBM ODM, please refer to my previous post about the IBM ODM API here.
- Creating a custom log file
- In our Java ODM API project let’s create a global variable to define the output file.

- Now create a constructor method to add the values you want in your custom log file. In this example we are obtaining the deployment time stamp when a business user deploys a Decision Service from the Business Console:

- Tip: Remember we need to throw an IOException class for our constructor.
- We can continue adding the values we require in our outfile variable. In this code example we are getting the following values:
- The timestamp an element changed (for example the deployment report)
- Who changed the element and who deployed it (business user who deploys the Decision Service)
- Rule project name
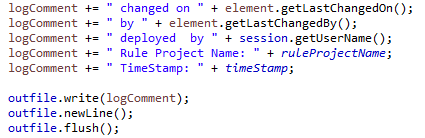
- Tip: Remember to format the log file with methods like newLine() and flush().
- Now we need to repackage and reinstall the teamserver.ear with our custom jar file and it will automatically start generating the log file when we make a Decision Service deployment. I will make a post explaining this process in detail in the future.
- In our Java ODM API project let’s create a global variable to define the output file.
If we did not specify an output location for the log file you will find it in <Your WAS Installation Path>\logs. I hope you enjoy this tutorial it helps you, please feel free to contact me with any feedback or questions! Thank you!
- Published in Decision Center, Java, ODM API, Rule Authoring, Rule Designer
Working with the Decision Center API
In many IBM ODM rules implementation projects we are going to have requirements that involve working with the IBM ODM API. Even though the Decision Center has a lot of powerful features to customize our rules, there are some things that can only be achieve by working with the API, this means we will have to work with java code and be familiar with the ODM API classes to accomplish our goals. In this tutorial I will show you the basics of how to establish a connection with the Decision Center from the Rule Designer and retrieve valuable project information. You can apply this for your particular requirement.
Steps:
- Getting familiar with ODM API
- We first need to take a moment and review some of the most important classes in the IBM ODM API documentation (IlrSession) , it’s ok if you don’t fully understand how they work at first. It is all about practice.
- Enter here to access the documentation.
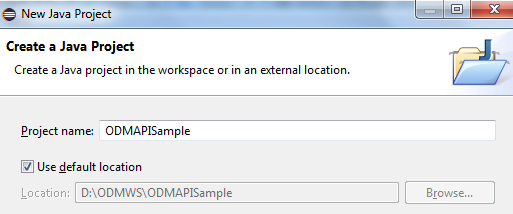
- Creating a Java project
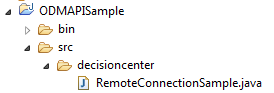
- Open Rule Designer and create a new Java Project
- Now we have to add the teamserver libraries to the build path for our Java project:
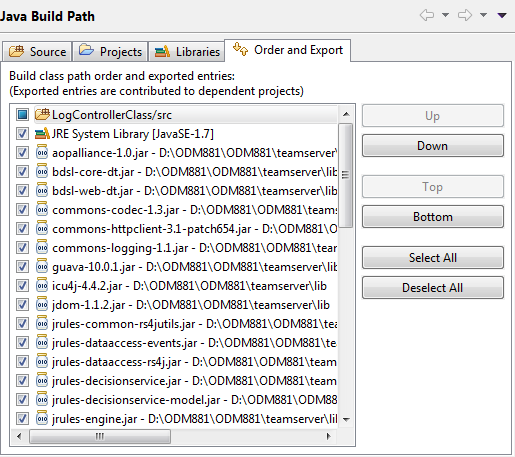
- Tip: the libraries are in <your_installation_path>\teamserver\lib
- Open Rule Designer and create a new Java Project
- Establishing the decision center connection
- Create a new main class to test our remote ODM API decision center connection
- Our java class needs to implement the IlrSession class:

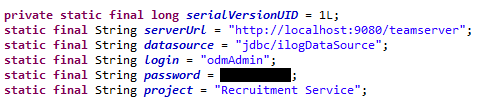
- Create your connection parameters, in my case:
- Now in our main class we need to create an object of the IlrSessionFactory class that implements IlrRemoteSessionFactory
- Lets call the connect method:

- Tip: be sure to work in a try/catch block to manage any connection exceptions
- Create a new main class to test our remote ODM API decision center connection
- Obtaining Decision Center data
- Now that we are able to connect to the Decision Center repository let’s try to obtain information about the project
- Create an object of IlrSession to obtain the current session:

- Lets obtain the rule project name:

Results:
We can work and obtain pretty much any data, object or method that is inside the Decision Center repository. We can also create our custom jar classes and repackage the teamserver.ear with it.
I hope you enjoy this tutorial and please let me now if you need help working with the ODM API and what do you want to see next. Thank you!
- Published in Decision Center, ODM API, Rule Designer
Automating deployments with Ant tasks
To deploy RuleApps to Rule Execution Server, automate managerial tasks within Decision Center, and run many of the samples, you must have Ant installed on your computer. IBM ODM comes with Ant in the <InstallDir>/shared/tools/ant path. In this tutorial I will show how to use Ant tasks to automate RuleApp management tasks, including reading a specified RuleApp archive from the RES console, create a well-formed RuleApp archive with all its mandatory execution resources and deploy a RuleApp archive to a running Rule Execution Server instance.
Steps:
First of all we need to set up our environment to automate processes, please follow the steps in this link.
- Downloading RuleApp instances from RES
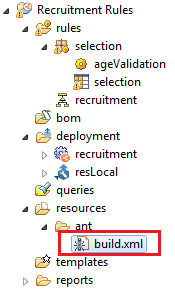
- Create an Ant Build file, you can this directly in your Rule project in Eclipse:
- Define your project and property variables values.
- Tip: You can define properties for your common values like hostname, destfile, userid and password.
- Please find the next sample as a demonstration of a working Ant build file:
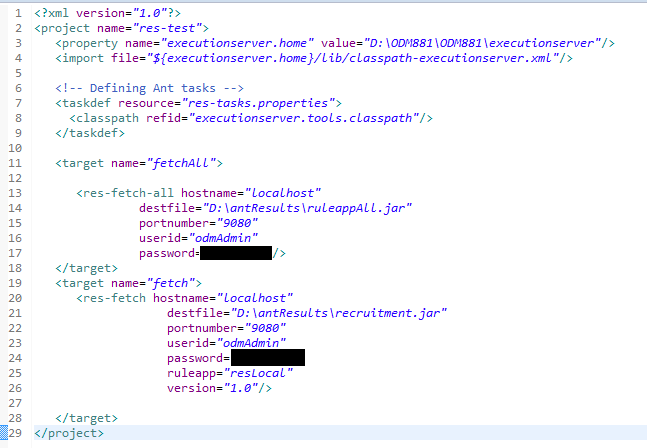
- The target res-fetch command extracts a specific Ruleapp value, the res-fetch-all will generate a .war file with all the Ruleapps present in the RES
- Create an Ant Build file, you can this directly in your Rule project in Eclipse:
- Deploying into RES with Ant Tasks
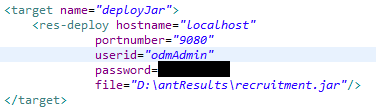
- Now that we have our jar file ready, we can automate the deployments with Ant Tasks by using the res-deploy command.
- You will need to add a new target to your build ant file or create a new one, this command requires the login credentials, jar path and hostname.
- Please refer to the following example:
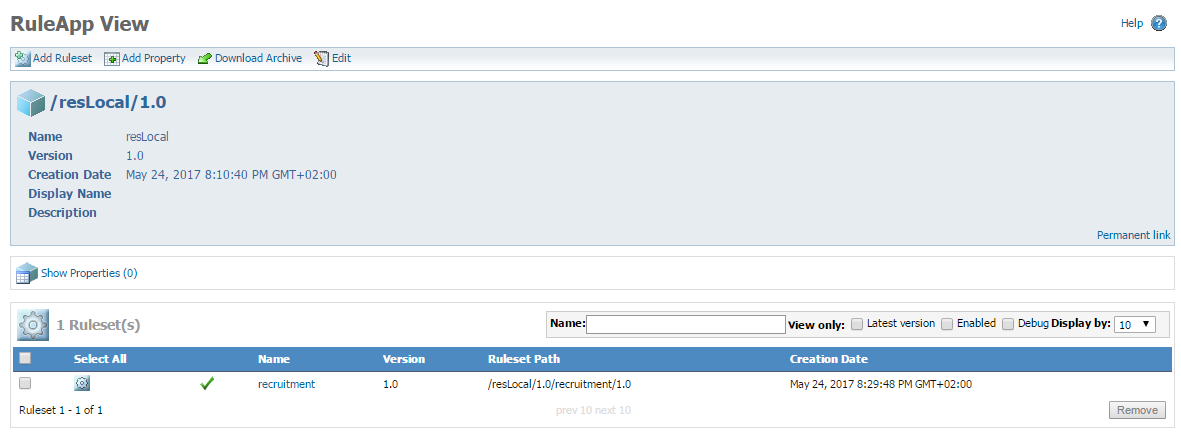
Results:
After running our deploy command we see our Ruleapp deployed in the RES:
There are many more automation and integration to be done with Ant Tasks, please let me know what you wish to see next, and as always feel free to comment or contact me with any feedback or support! Thank you!
- Published in Ant Tasks, Rule Authoring, Rule Designer, Rule Execution Server (RES)
Deploying Rule projects into IBM Bluemix
IBM Bluemix is a cloud platform that helps you solve real problems and drive business value with applications, infrastructure and services. There are other powerful cloud services like AWS, Azure or Google Cloud platform but IBM Bluemix comes with pre-designed services for your IBM software solutions. In this article we will see how the Business Rules service allows us to deploy our Decision Operations from Rule Designer or Decision Center console directly to IBM Bluemix cloud. In order to test this you will need to create a IBM Bluemix account that comes with 30 days free trial.
Steps:
- Creating the Business Rules service
- Login to your IBM Bluemix account.
- Click “Catalog” and search for “Business Rules”
- Tip: This service gives you 1,000 API calls free per month that is more than enough for dev purposes, you can cancel the service at any time.
- Click “Create” and give a proper name.
- Navigate to the “Connection Settings” tab and you should be able to see the connection details like this:
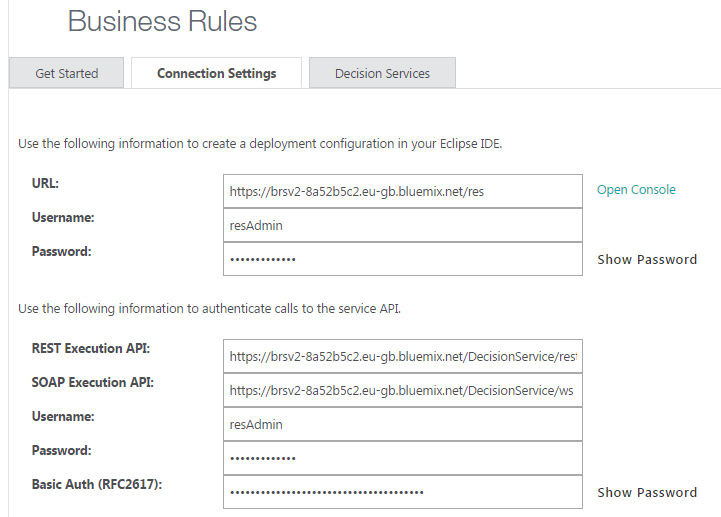
- Tip: Click “Open Console” and navigate just like in your RES local installation.
- Configuring the Deployment
- Now that our Business Rules service on IBM Bluemix is ready, let’s configure and deploy the Rule project.
- Open Rule Designer and navigate to the deployment folder of the Rule project.
- If you have a previous deployment configuration already set up you can just add the new IBM Bluemix RES server target:
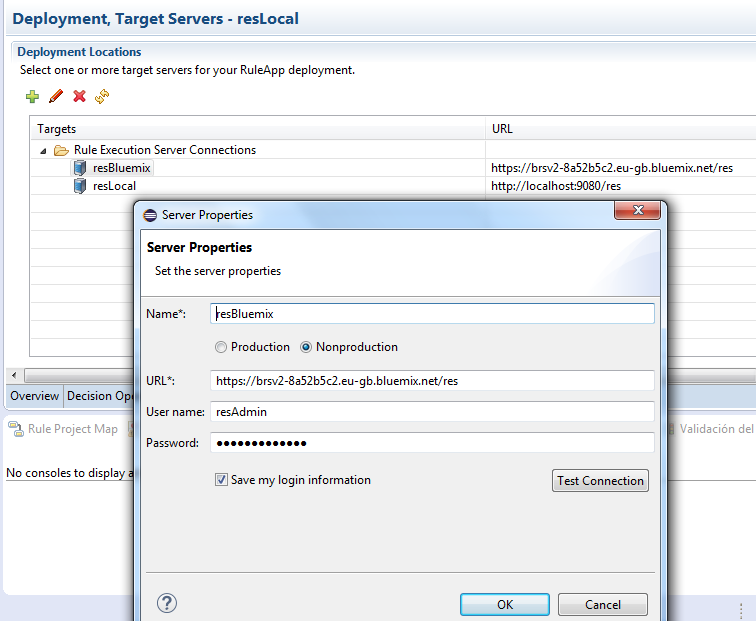
- Insert the Bluemix connection details and test the connection.
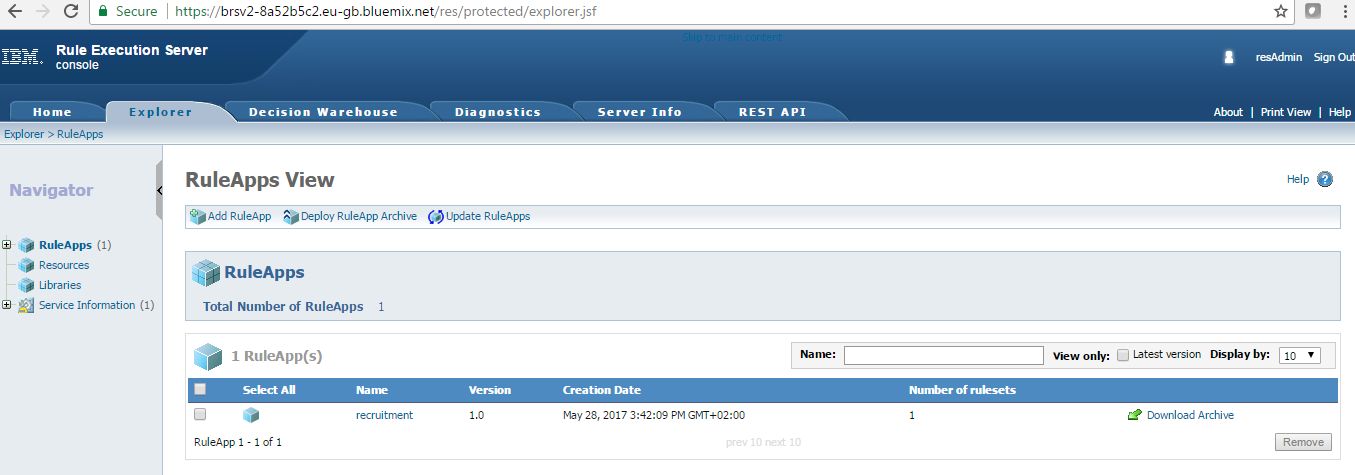
- Deploy the Decision Operation Ruleapp and verify the deployment by accessing the IBM Bluemix RES console.
- The Ruleapp should appear like this:
- Testing our Rule web service in SoapUI
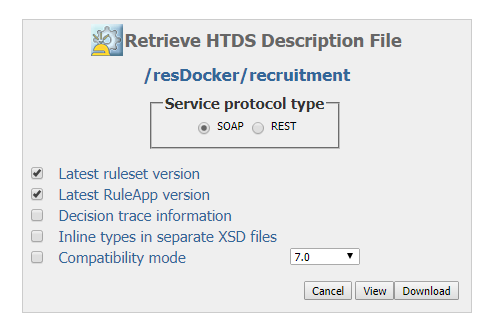
- Navigate to the Ruleset view by clicking on the Ruleapp Name and then the Ruleset name in the RES console.
- Click the “Retrieve HTDS Description File” option:

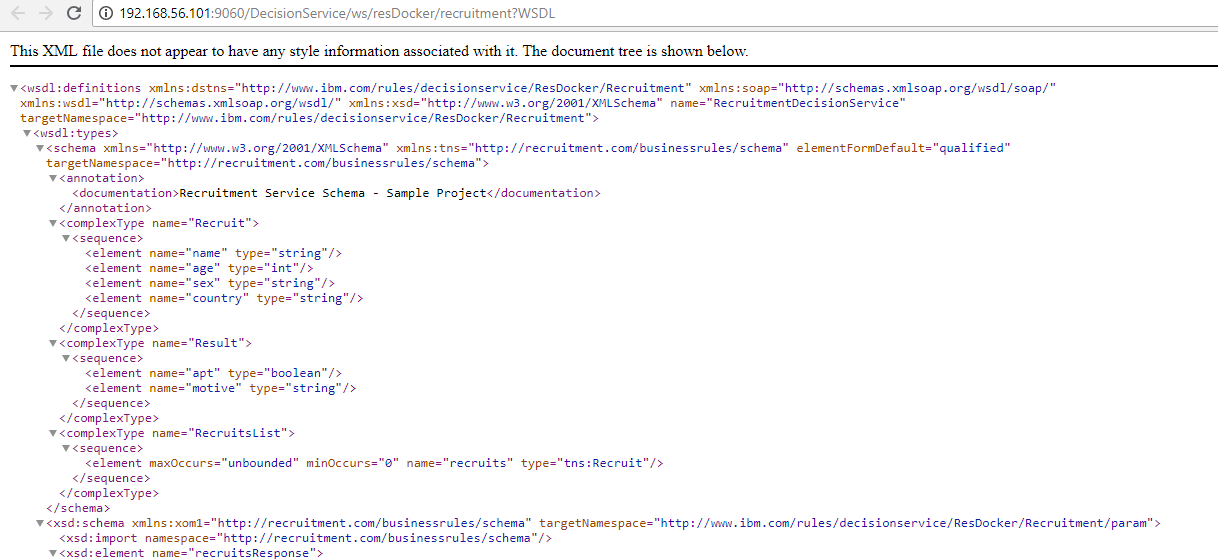
- Download the SOAP HTDS file or click view and copy the WSDL URL.
- Open SoapUI and create a New SOAP project.
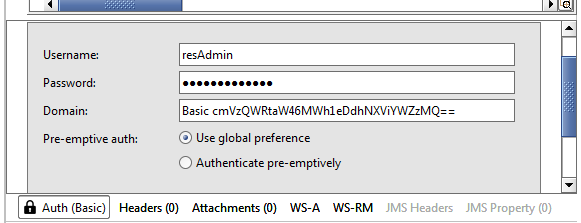
- Insert the wsdl URL, username and password.
- Now you have the request ready, the only thing missing is the security authorization. Click the “Auth” option and select Basic, type the Bluemix Business Rules service username and password.
Results:
You are ready to call your Rules from anyplace, anywhere. Just share your WSDL url with the client application and give the proper authorization. Having the Rule Execution Server on the cloud is a great way to test your rules in development without depending on your local Sample Server.
I hope you enjoy this tutorial and as always please feel free to contact me for any feedback or questions! Thank you!
- Published in Bluemix, Cloud, Rule Authoring, Rule Designer, Rule Execution Server (RES)
Working with Lists in the XOM / BOM
The XOM (Execution Object Model) and BOM (Business Object Model) are key artifacts of our Rule project. The execution object model (XOM) is the model against which you run rules, it references the application objects and data, and is the base implementation of the business object model (BOM). For more information about XOM/BOM visit the IBM Knowledge Center here.
We can generate our BOM entries from a XOM (Java or XSD) and get the objects we will verbalize for our rules. A very common requirement in a project is to work with Lists and return a populated List with values from a Rule Action or Decision Table. You will notice that after you create your BOM entry from an XOM with Lists (maxOccurs=”unbounded”) you will get an object of type java.util.Vector but with no direct relationship between the elements. Please review the following problem example and a workaround on how to fix it and implement Lists correctly.
Problem:
Let’s say you have an XSD with an element like this:
<complexType name=”RecruitsList”>
<sequence>
<element name=”recruits” type=”tns:Recruit” maxOccurs=”unbounded” minOccurs=”0″></element>
</sequence>
</complexType>
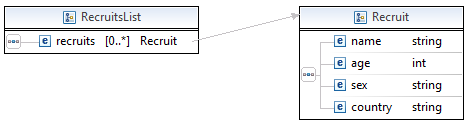
After you create the BOM entry, you will get an object like this:
With no proper verbalization and without a way to use it in a Rule Action, Decision Table or Decision Tree correctly. In this example we want to add objects of type Recruit to our RecruitsList and display this list in the output of our Decision Service. Follow the steps below to implement a workaround and accomplish our goal.
Steps:
- Creating a new Method member
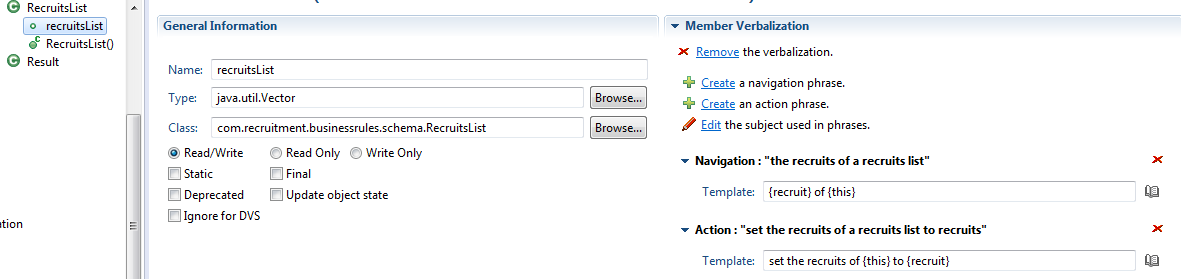
- Let’s remove this verbalization and navigate to the Class tab.
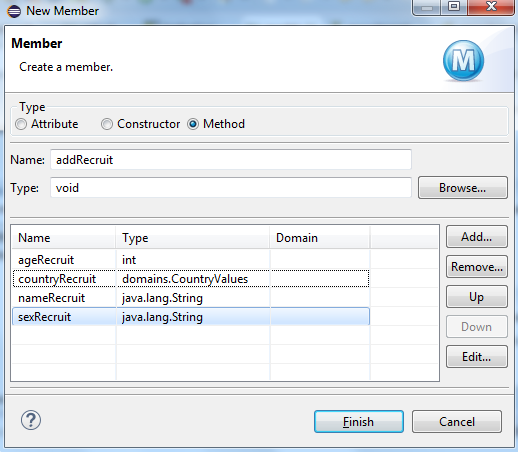
- We are going to create a new method to add our Objects. Click “New…” in the Members section.
- Select “Method”, give a proper Name and “void” for Type.
- Now add Arguments according to the Object you are going to add to your list, in our example the Recruit’s attributes. At the end you should have something like this:
- Tip: Remember that the types have to match, if you are using a virtual value assign the corresponding type like the example. For more information about dynamic domains and virtual values read my previous post here.
- Now we need to create a proper verbalization for our new method and implement the BOM to XOM Mapping logic.
- Navigate to the Member Verbalization section and click “Create”. Modify the Action phrase according to your Object. In this sample:
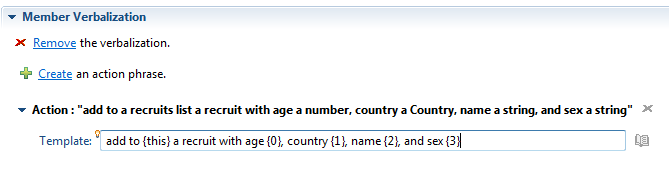
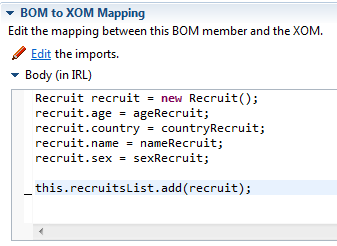
- The last and most important step is to define our BOM to XOM Mapping logic. We need to map our method arguments with the attributes of our Object, in this sample with the Recruit’s age, country, name and sex:
 Tip: Don’t forget to initialize the response list variable in your ruleflow or variableSet.
Results:
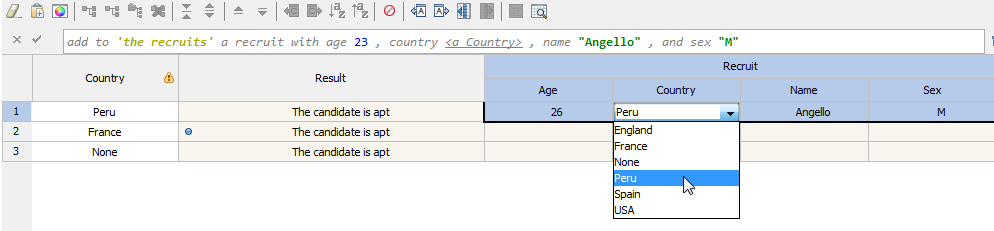
Now we are ready to use our method in any Rule and return a list structure schema in our Decision Service response!
Decision Table demonstration sample:
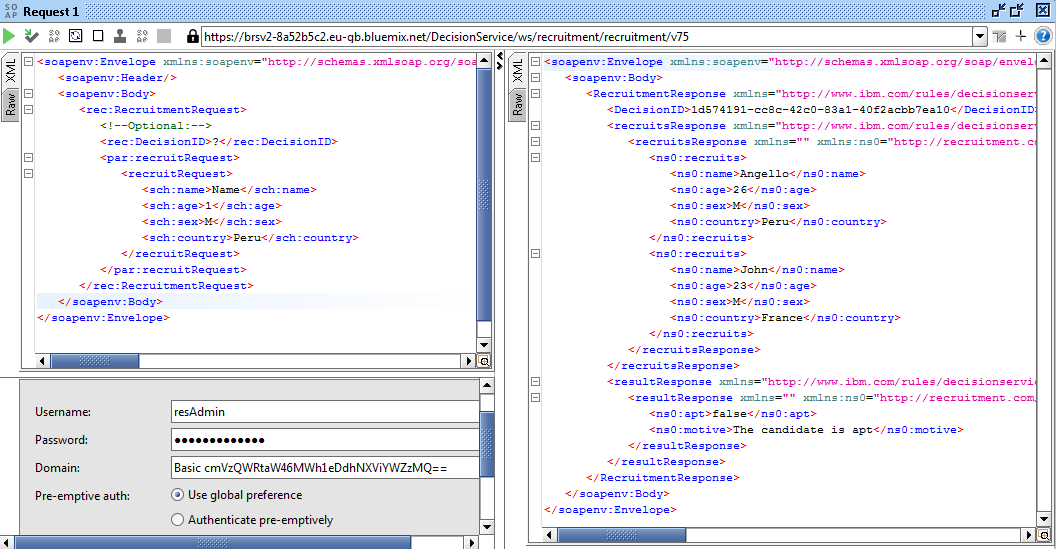
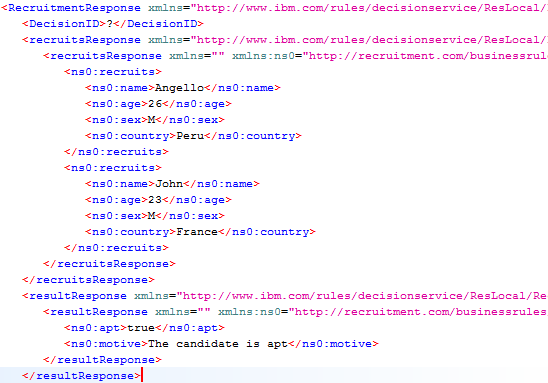
After we test our rules we will see this list structure in the response (Testing with SoapUI):
Please feel free to comment or contact me with any doubts or feedback. Thank you!
- Published in Java, Rule Authoring, Rule Designer, Rule Execution Server (RES)
Debugging a simple Ruleflow in Rule Designer
There are many ways to test our rules, we can use Excel DVS testsuites, decision operations, web services applications like SoapUI and more, but sometimes we need to debug our ruleflow to find a particular bug that is preventing us to continue. When developing a new rule project in Rule Designer we often need to see the output of our rules without having to deploy our solution and see the behavior of the ruleflow to compare the variables values.
In this article I am going to show how to debug a simple ruleflow using a decision operation to test your Rules.
Steps:
Let’s assume we already have the ruleflow, variables and rules.
- Creating the Decision Operation
- Right click the “deployment” folder in your Rule Project and select New -> Decision Operation.
- Give a proper name, select the Rule Project and select the Ruleflow inside your Rule Project.
- Now open your Decision Operation and you should have one like this:

- Click “Define” or to the “Signature” tab.
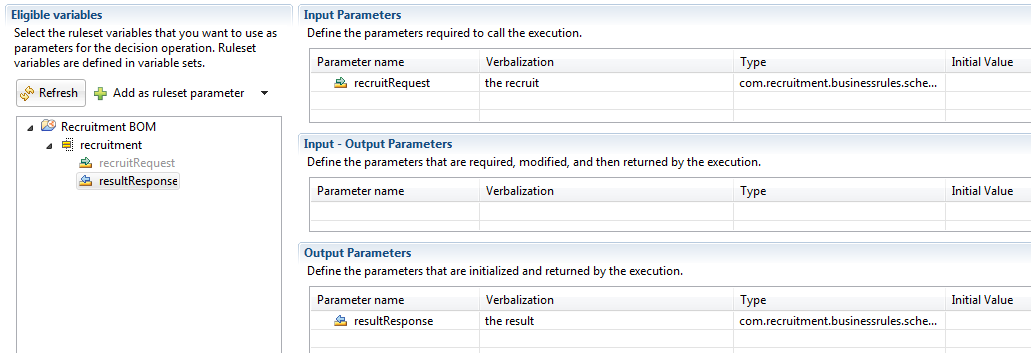
- Expand your varible set and drag and drop the corresponding variables to the Input and Output Parameters.
- Tip: Is a good practice to name your input variable with “Request” at the end and “Response” for your output.
- Setting the breakpoints
- There a many places where we can define our breakpoints, it depends on what you need to test and where do you want the flow to stop execution. I will show some examples of places where you can put your breakpoints next.
- Action Rule:
- Open your Action Rule, right click in the gray space of any Action line and select “Toggle Breakpoint”
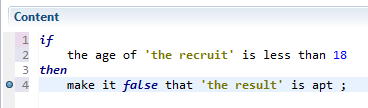
- Open your Action Rule, right click in the gray space of any Action line and select “Toggle Breakpoint”
- Decision Table:
- Open your Decision Table, right click in any cell of an Action column and select “Toggle Breakpoint”

- Open your Decision Table, right click in any cell of an Action column and select “Toggle Breakpoint”
- BOM member
- Open a BOM member with BOM to XOM mapping logic, locate the Setter code, right click in the gray space and select “Toggle Breakpoint”
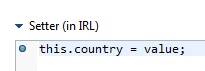
- Open a BOM member with BOM to XOM mapping logic, locate the Setter code, right click in the gray space and select “Toggle Breakpoint”
- Ruleflow artifacts
- This is the most common way to debug our Rules, in the ruleflow you can add breakpoints to any task. Select any task, right click and select “Toggle Breakpoint”
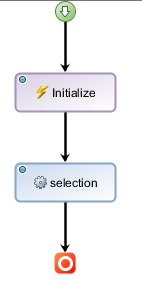
- This is the most common way to debug our Rules, in the ruleflow you can add breakpoints to any task. Select any task, right click and select “Toggle Breakpoint”
- Creating the Debug Configuration
- Navigate to Run -> Debug Configurations… in your Rule Designer top bar.
- Locate the Decision Operation artifact, right click and select New.
- Give a proper name and Browse for your Decision Operation.
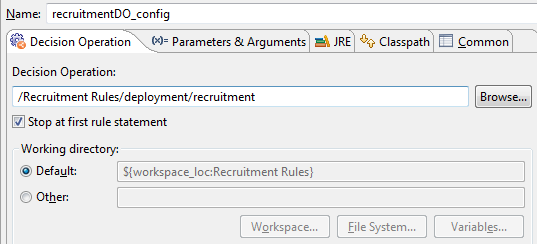
- Tip: The checkbox “Stop at first rule statement” guarantees you enter debug mode if you didn’t set any breakpoints.
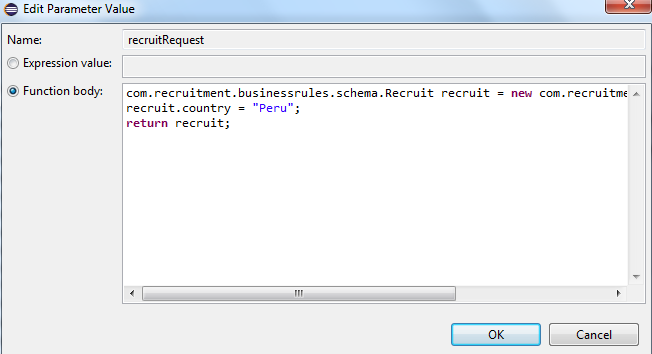
- Now the most important step is to define the “Parameters and Arguments” for this configuration, select the tab and click “Edit Value”.
- You have to create and return a new object of your Input Parameter class, you can also assign testing values. Click “Function body” and add the proper code. Take a look at my sample:
- Click Apply and Debug.
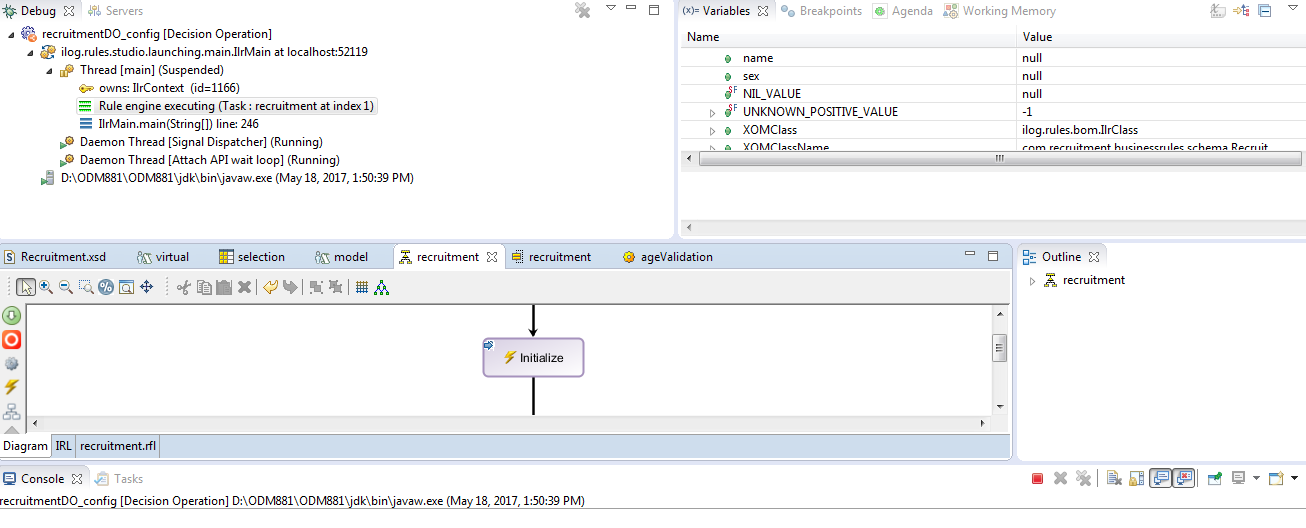
Results:
Now you are in Debug mode, watch your variables and step through your code and rules!
I hope you enjoy this article, as always please feel free to contact me about any question or feedback. Thank you!
- Published in Debug, Decision Operation, Java, Rule Authoring, Rule Designer, Ruleflow
- 1
- 2