RPA – UiPath: Working with Excel
In this blog post we will talk about working with Excel files in one of the top RPA tools: UiPath. As we know Robotic process automation (RPA) is the practice of automating routine business practices with “software robots” that perform tasks automatically. These tasks include transaction processing, IT management and automated online assistants. These software robots could replace human beings for common tasks, being Excel one the most used business tools in the world.
To understand the basics of UiPath, please refer to this link.
In this example we are going to use a case defined in a practice exercise of the UiPath academy where we have different values in 2 columns (A and B) and we need to write the sum in the column C. This is a pretty simple task but we are going to do it in 3 different ways and analyze the development and execution time for each solution.
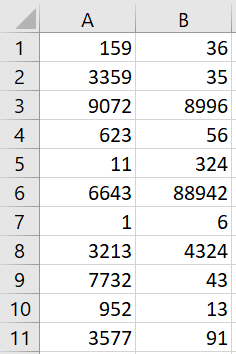
The input file example:
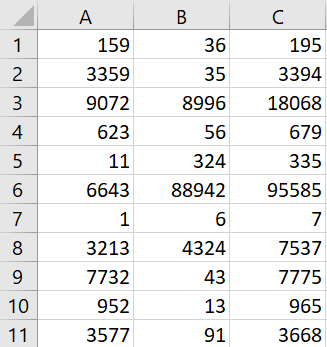
Output file example:
First method: Using Excel Application Scope and Get Row activities
- This is standard way. We are going to have the following composition:
- Main Sequence
- Excel Application Scope
- Read Range
- For each row
- Find current row
- Get Row A
- Get Row B
- Assign sum to value C
- Write value C in C Column

- Excel Application Scope
- Main Sequence
- Let me explain the steps of this method:
- We open the Input excel file with the Excel Application Scope
- We read the values using the “Read Range” activity and saving the output in a Datatable variable
- Now for each row we get the Column A and B values with the “Get Row” activity
- We add the total to third variable
- We use the “Write Cell” activity to write the third value in the Column C
Second method: Without using Excel Application Scope
- In this method we will do everything internally and we are going to create the C column manually. This is the composition:
- Main Sequence
- Read Range
- Add data column
- For each row
- Assign A value
- Assign B value
- Set the value for Column C
- Write Range
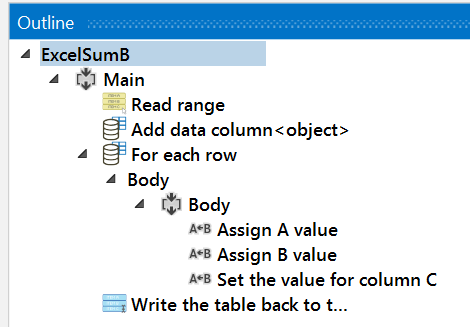
- Main Sequence
- Explanation:
- We read the values using the “Read Range” activity and saving the output in a Datatable variable
- We add the Column C using “Add Data Column” activity
- Now for each row we get the Column A and B values using “Assign” activity
- We assign the sum to the Column C (row (2)) value parsing to the A and B values to integer
- We write the whole table back to the original excel or a new file using “Write Range” activity
Third method: Using Excel Application Scope and Excel formulas
- In this method we will use the Excel internal formulas to sum the values and save coding time. This is the composition:
- Main Sequence
- Excel Application Scope
- Read Range
- Assign rows count
- Write Value
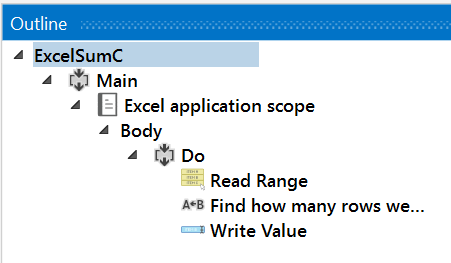
- Excel Application Scope
- Main Sequence
- Explanation:
- We read the values using the “Read Range” activity and saving the output in a Datatable variable
- We find out the number of rows and assign it to a variable
- Now we finish by writing directly “=SUM(A1,B1)” in the “C1:C”+rowsCount range.
Conclusion:
We have successfully automate the use case using 3 different methods. Now let’s analyze the results and benefits of each case using 3 aspects:
- Development: involving the difficulty of doing it and how robust and easy to understand the code is.
- Execution time: how fast the robot executes the code
- Benefits for the business
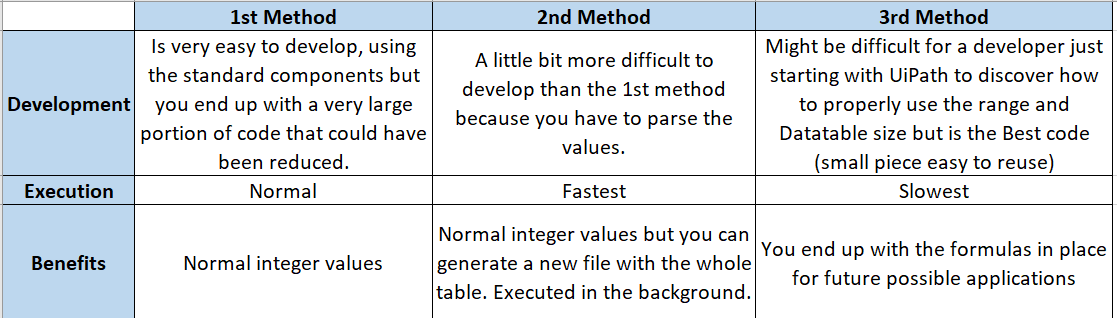
In conclusion, the 3 methods work ok and it will depend on the business needs and developers to use the correct way for each process.
I hope you enjoy this article about UiPath and as always feel free to contact me with any questions or feedback. Thank you!
Working with Lists in the XOM / BOM
The XOM (Execution Object Model) and BOM (Business Object Model) are key artifacts of our Rule project. The execution object model (XOM) is the model against which you run rules, it references the application objects and data, and is the base implementation of the business object model (BOM). For more information about XOM/BOM visit the IBM Knowledge Center here.
We can generate our BOM entries from a XOM (Java or XSD) and get the objects we will verbalize for our rules. A very common requirement in a project is to work with Lists and return a populated List with values from a Rule Action or Decision Table. You will notice that after you create your BOM entry from an XOM with Lists (maxOccurs=”unbounded”) you will get an object of type java.util.Vector but with no direct relationship between the elements. Please review the following problem example and a workaround on how to fix it and implement Lists correctly.
Problem:
Let’s say you have an XSD with an element like this:
<complexType name=”RecruitsList”>
<sequence>
<element name=”recruits” type=”tns:Recruit” maxOccurs=”unbounded” minOccurs=”0″></element>
</sequence>
</complexType>
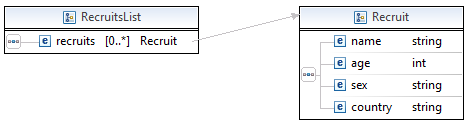
After you create the BOM entry, you will get an object like this:
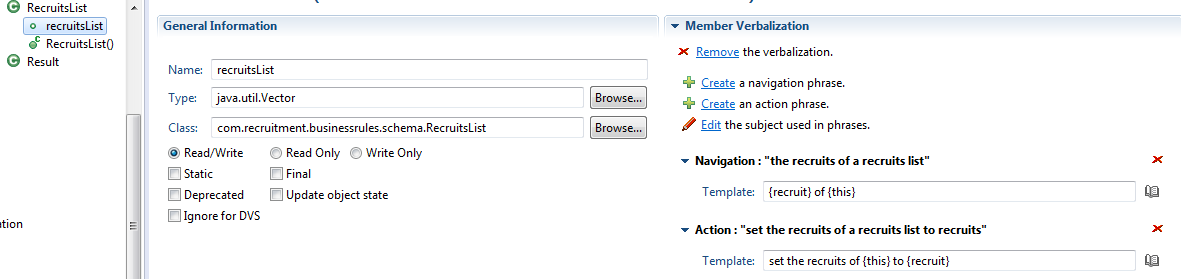
With no proper verbalization and without a way to use it in a Rule Action, Decision Table or Decision Tree correctly. In this example we want to add objects of type Recruit to our RecruitsList and display this list in the output of our Decision Service. Follow the steps below to implement a workaround and accomplish our goal.
Steps:
- Creating a new Method member
- Let’s remove this verbalization and navigate to the Class tab.
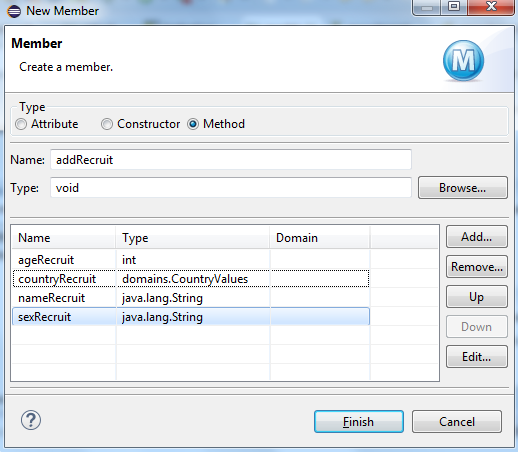
- We are going to create a new method to add our Objects. Click “New…” in the Members section.
- Select “Method”, give a proper Name and “void” for Type.
- Now add Arguments according to the Object you are going to add to your list, in our example the Recruit’s attributes. At the end you should have something like this:
- Tip: Remember that the types have to match, if you are using a virtual value assign the corresponding type like the example. For more information about dynamic domains and virtual values read my previous post here.
- Now we need to create a proper verbalization for our new method and implement the BOM to XOM Mapping logic.
- Navigate to the Member Verbalization section and click “Create”. Modify the Action phrase according to your Object. In this sample:
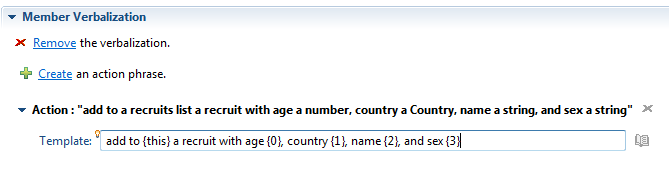
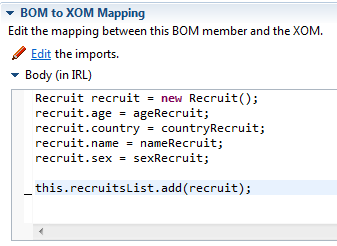
- The last and most important step is to define our BOM to XOM Mapping logic. We need to map our method arguments with the attributes of our Object, in this sample with the Recruit’s age, country, name and sex:
 Tip: Don’t forget to initialize the response list variable in your ruleflow or variableSet.
Results:
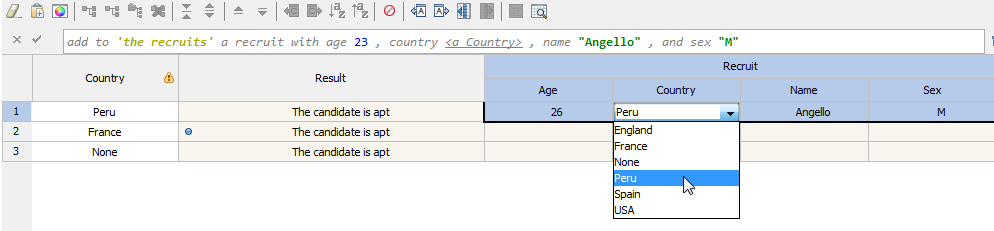
Now we are ready to use our method in any Rule and return a list structure schema in our Decision Service response!
Decision Table demonstration sample:
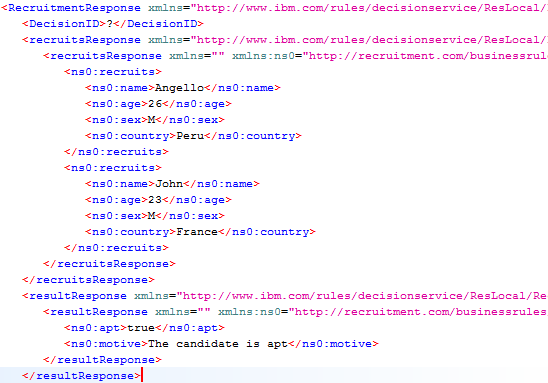
After we test our rules we will see this list structure in the response (Testing with SoapUI):
Please feel free to comment or contact me with any doubts or feedback. Thank you!
- Published in Java, Rule Authoring, Rule Designer, Rule Execution Server (RES)